The Milk Maker from Hopps & Woolf, Giveaway + Cinnamon & Coffee Bean Smoothie

Cinnamon & Coffee Bean Smoothie


Cinnamon & Coffee Bean Smoothie | coconutandberries.com

I do think it’s fantastic that the world is beginning to connect the dots, recognizing that not everyone wants to drink dairy and responding with new non-dairy milks popping up on supermarket shelves left, right and centre. But unfortunately most of these boxed milks aren’t all that fantastic nutritionally-speaking.

Did you know that most store-bought almond milk contains less than 2% almonds? And of course there are usually a bunch of added ingredients – including sugar, gums, preservatives and things I don’t even recognize. All fine and dandy for a convenience product every now and again but not really something I want to be consuming day in day out.

Making your own non-dairy milk at home means you can control what goes in it and it tastes far far better too.

Hopps & Woolf Milk-Maker Review & Giveaway | coconutandberries.com

There is one drawback to making your own and that’s that it goes bad very quickly – lasting for only about 48 hours.

That’s why The Milk Maker from Hopps & Woolf is a real game changer. This nifty piece of equipment makes non-dairy milk that lasts up to 5 days (mine’s actually still been fine after 7 days)! Along with blending the nuts and water, it gently heats and pasteurises the resulting milk which is what means it keeps better than my usual homemade nut milk. It tastes just as good too.

Hopps & Woolf Milk-Maker Review & Giveaway | coconutandberries.com

At first I was slightly concerned that heating the milk would make it less nutritious but reasoned that if the Milk Maker is going to make it easier for me to always have fresh nut milk in my fridge and not have to resort to the bought stuff with all the unnecessary added ingredients, then I’m not too worried about any damage a little heat is doing. I’ve been using my Milk Maker for a month now and haven’t bought a single carton in that time.

The Milk Maker is refreshingly easy to use too. You just add your soaked nuts/seeds to the machine with fresh water, hit the “milk function” button and let it do its thing for 20 minutes. After the time is up, you strain your milk through the sieve provided or a nut milk bag, and voilà! Fresh nut milk to bottle up and keep handy for drinking on its own, pouring over cereal, making smoothies, using in baking and cooking, and however else you like to use it.

Homemade Almond Milk & Granola

You can use any nuts or seeds in the Milk Maker or even soy beans, brown rice or oats for other non-dairy milk options. If you’re curious, have a watch of this video the boys behind the company have put together to show the Milk Maker in action!

Hopps & Woolf have kindly allowed me one Milk Maker to give away! Enter the giveaway via the Rafflecopter widget at the bottom of this post to be in with a chance. (UK ONLY)

Cinnamon & Coffee Bean Smoothie | coconutandberries.com

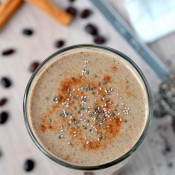
It’s getting chillier now so I haven’t been making many smoothies lately but I got the urge to the other day and and came up with this Cinnamon & Coffee Bean Smoothie.

I’m not a big coffee drinker, and I used to only like it when combined with chocolate (!) as in my Healthy Mocha Hazelnut Shake, but I have been warming to it more recently and a sweet creamy cinnamon & coffee smoothie was sounding really good. I don’t have any instant coffee at home and didn’t want to brew a pot only to use a small amount, then it occurred to me that I could throw whole coffee beans into my blender! It worked a treat and my blender blitzed them up completely. I’m sure my homemade almond milk made it all the more delicious too.


Cinnamon & Coffee Bean Smoothie

Yield: 2 Servings

Ingredients

  • 2 C Almond milk (preferably homemade)
  • 1 Tbsp Chia seeds
  • 1 Tbsp Lucuma (optional)
  • 5-10 Whole coffee beans
  • 1/2 Frozen banana (optional)*
  • 1 Medjool Date, pitted
  • 2 tsp Cinnamon
  • Pinch of salt
  • Pinch of vanilla powder

Instructions

  1. Blend together all ingredients in a high-powered blender. Serve immediately.

Notes

* If omitting the frozen banana, add a small handful of ice to chill the smoothie. You may also want to add an extra date or your favourite sweetener to boost the sweetness a touch.

http://www.coconutandberries.com/2014/11/17/milk-maker-hopps-woolf-giveaway-cinnamon-coffee-bean-smoothie/

Cinnamon & Coffee Bean Smoothie | coconutandberries.com

a Rafflecopter giveaway

For more info about the Hopps & Woolf Milk Maker, visit their website.

If you’re new to Coconut and Berries, please sign up for email updates and join me elsewhere! I’m on Facebook, Pinterest, Instagram (@coconutandberries), Google + and Twitter! You can also follow Coconut and Berries with Bloglovin or Feedly.

[Disclosure: Hopps & Woolf kindly sent me one of their Milk-Makers for review purposes, but I received no other compensation and, as always, all opinions are my own]

Raw Pomegranate Coconut Mousse

Raw Pomegranate Coconut Mousse

Raw Pomegranate Coconut Mousse | coconutandberries.com

As much as I’ve been enjoying eating apples and pears for the past month or so, it’s rather nice to see some more colour in the fruit department now – the season for clementines, satsumas, cranberries and pomegranate has arrived!

I’m especially fond of pomegranate and am surprised to see I only have a couple of recipes on the blog featuring it: A simple Beetroot & Pomegranate Salad and my Cabbage, Apple & Pomegranate Salad with Ginger-Almond Dressing (one of my very favourites!).

But I love pomegranate with breakfast: as a topping for non-dairy yogurt, porridge, granola, chia pudding or even pancakes. And of course it’s wonderful with all things chocolate for dessert.

Pomegranate

Along with chocolate, coconut is my top choice for dessert (I hope it’s becoming one of yours too with all the coconutty ingredients I use in my recipes!).

Rhythm Virgin Coconut Milk

I recently discovered a new coconut product -  Rhythm Health‘s Virgin coconut milk. It’s very different to the canned coconut milk I’m used to which is definitely a liquid and is actually 50% (or more) water. This stuff, as you can see from the label, is 100% coconut milk, cold-pressed and with no added water. I tried some straight from the packet and nearly ate it all like that it was so good on its own. It’s super thick, a teeny bit tangy and incredibly rich.

 I resisted eating the lot straight away and put it to use in a recipe…

Raw Pomegranate Coconut Mousse | coconutandberries.com

To make this Raw Pomegranate Coconut Mousse, I infused the virgin coconut milk with some sweet and tangy pomegranate flavour using pure pomegranate juice. I used Biona Organic pure pomegranate juice which is made by pressing fresh pomegranates (and not from concentrate) since it takes quite a lot of pomegranates to get any significant quantity of juice, but you could juice your own if you have the patience. Adding the juice obviously thins out the milk somewhat so I blended in some cashews and chia seeds which together give an ultra thick, fluffy texture.

Raw Pomegranate Coconut Mousse | coconutandberries.com

I like to layer up the mousse with some whole pomegranate arils for a little freshness and crunch to balance the creaminess. I think it looks pretty served like that too!

Raw Pomegranate Coconut Mousse

Yield: 3-4 Servings

Raw Pomegranate Coconut Mousse

Ingredients

  • 3/4 C Rhythm coconut milk*
  • 1/2 C Cashews
  • 3/4 C Pure pomegranate juice (not from concentrate)
  • 3 Tbsp White chia seeds**
  • 1 tsp Fresh beetroot juice***
  • 1/16 tsp Almond extract (optional)
  • 1/2 tsp Vanilla extract
  • 2 Tbsp Coconut OR Agave nectar
  • Pinch of salt
  • Pomegranate seeds

Instructions

  1. Blend together the coconut milk, cashews and pomegranate juice in a high-powered blender until completely smooth.
  2. Add all remaining ingredients, except pomegranate seeds, and blend again (If you don't have a high-powered blender, grind the chia seeds before adding to the blender).
  3. Pour mixture into a bowl and refrigerate for at least 4 hours, and up to overnight.
  4. When ready to serve, place a couple of spoonfuls of pomegranate seeds in the bottom of 3-4 serving dishes/glasses/mini jars, spoon the pomegranate mousse on top and sprinkle with a few more pomegranate seeds.

Notes

* If you can’t get hold of Rhythm Virgin coconut milk I recommend using an equal quantity of coconut yogurt, or, failing that, full-fat canned coconut milk and increasing the cashews to 3/4 C and chia seeds to 1/4 C.

** I recommend white chia seeds for the best colour

*** I added a tiny bit of beetroot juice to boost the pink.

http://www.coconutandberries.com/2014/11/13/raw-pomegranate-coconut-mousse/

What’s your favourite way to enjoy pomegranate?

If you’re new to Coconut and Berries, please sign up for email updates and join me elsewhere! I’m on FacebookPinterestInstagram (@coconutandberries), Google + and Twitter! You can also follow Coconut and Berries with Bloglovin or Feedly

[Disclosure: Rhythm Health kindly sent me some of their virgin coconut milk for review purposes, but I received no other compensation and, as always, all opinions are my own]

Hearty & Wholesome Meatless Ragù

Hearty and Wholesome Meatless Ragu

Hearty & Wholesome Meatless Ragu | coconutandberries.com

Pumpkin lanterns have all been cleared away, spooky cupcakes have been eaten up and Halloween is over for another year – but it’s already time for the next holiday – no, not Christmas yet, but Bonfire Night!

I’m not sure how widely known the story behind the celebrations is outside of Great Britain, so for my readers further afield I’ll give a quick summary… in short, on the 5th November, 1605, a man called Guy Fawkes attempted but failed to blow up the Houses of Parliament. Since that day, every 5th of November Britons celebrate the survival of King James and the defeat of the plot with displays of fireworks and bonfires.

Hearty & Wholesome Meatless Ragu | coconutandberries.com

I’ve always liked the occasion, definitely much more so than Halloween anyway, and growing up I enjoyed going to a local fireworks display, waving sparklers and eating my Granny’s homemade toffee – a special Bonfire night treat!

Come November time, it’s usually pretty chilly, so it makes sense to fill your tummy with a warming meal before heading out into the cold to watch the fireworks. Today’s recipe is just the thing!

Hearty & Wholesome Meatless Ragu | coconutandberries.com

My “Hearty and Wholesome Meatless Ragù”  is much more satisfying and tasty than your average pasta sauce. It’s got plenty of nutrition from the lentils, chickpeas and chunky vegetables, and the sun-dried tomatoes and mushrooms add richness and extra texture.

Hearty & Wholesome Meatless Ragu | coconutandberries.com

Pasta gets a bad rap for being rather lacking in the nutrition department and it’s true that your typical white pasta, while it will fill your tummy, isn’t particularly nourishing. I’ve tried whole wheat and gluten-free pastas in the past, but they’ve left a lot to be desired taste-wise.

Fortunately, there are much better options these days and lately I’ve been really enjoying Rizopia’s brown rice pasta. It’s wholegrain and gluten-free but with no gumminess or graininess, just the regular taste and texture you’d hope for for your pasta.

Top it with my super-duper ragù and you’ve got an easy, balanced meal - definitely suitable for a weeknight and the perfect Bonfire night supper.

If you don’t fancy pasta, this ragù would also be nice over a baked potato or mash, or simply with a chunk of good-quality bread on the side.

Hearty & Wholesome Meatless Ragù

Yield: 4 Servings

Hearty & Wholesome Meatless Ragù

Ingredients

  • 1 Tbsp Olive oil
  • 1/2 Onion, chopped
  • 1 Carrot, chopped small
  • 1 Stalk of celery, chopped small
  • 2 Cloves of garlic, minced
  • 1 tsp Fresh thyme
  • Approx 175g/6oz Mushrooms, chopped
  • 6 Sun-dried tomatoes, rehydrated and chopped
  • 1 Tbsp Balsamic vinegar
  • 1/4 C Red wine OR Vegetable broth
  • 1/2 400g/14oz Can Chopped tomatoes
  • 3/4 C Cooked lentils
  • 3/4 C Cooked chickpeas
  • Salt and pepper
  • Chopped fresh parsley (optional)

Instructions

  1. Warm the olive oil in a medium-large pan over medium heat. Add the onion, carrot and celery and cook, stirring for approx 10 minutes, or until softened. Add the garlic and thyme and cook for a further minute.
  2. Add the mushrooms, sun-dried tomatoes and balsamic vinegar and cook for 5 minutes, stirring from time to time.
  3. Add the vegetable broth and tomatoes, turn up the heat and then allow to simmer for 10 minutes. Add the lentils, chickpeas and plenty of salt and pepper and simmer for 5 more minutes until the beans are warmed through.
  4. Serve over pasta, mashed or baked potatoes or with crusty bread.
http://www.coconutandberries.com/2014/11/04/hearty-wholesome-meatless-rag/

Hearty & Wholesome Meatless Ragu | coconutandberries.com

UK readers, will you be heading out to watch any fireworks? Readers beyond, do you know about Bonfire night?!

If you’re new to Coconut and Berries, please sign up for email updates and join me elsewhere! I’m on FacebookPinterestInstagram (@coconutandberries), Google + and Twitter! You can also follow Coconut and Berries with Bloglovin or Feedly

[Disclosure: Rizopia send me some free samples of their gluten-free pasta to try but I was under no obligation to write about it, and, as always, all opinions are my own]

Orange Pepita Granola and Yum Universe Book Giveaway

Orange Pepita Granola

I’m talking about a wonderful new book today, Yum Universe, sharing a recipe AND giving one of you the chance to win a copy!

Yum Universe Review

I’ve been reading and introducing others to the Yum Universe website for a long time now and it’s one of the first sites/blogs I started using and cooking from when I went vegan nearly 5 years ago. Everything I love about the site and a whole lot more has been put into this stunning new book of the same name by Yum Universe founder, Heather Crosby.

Almond Pulp Chocolate Pudding

Almond Pulp Chocolate Pudding-

A great way to use up that leftover pulp when making your own nut milks at home

This is so much more than a recipe book. Heather starts with why you might consider a “plant-inspired diet”, addressing common concerns and bringing some clarity to the huge confusion that exists in the world of diet and health. Though I’m already very committed to this lifestyle,  I still found this section fascinating and it definitely reinvigorated my commitment to healthy living.

The “how” section is hugely comprehensive and an amazing resource for everyone, from those who’ve never cooked vegetables  to long-time vegans. I’ve picked up so many useful tips I can’t even begin to list them. But what I can say is that the book is helping me cultivate habits which are, in turn, making eating healthily on a day-to-day basis that bit easier.  There are complete guides to recommended kitchen equipment and ingredients, storage advice, plan-ahead suggestions and a whole lot more.

Chickpea Flatbread with Blackberries, Balsamic & Thyme

Chickpea Flatbread with Blackberries, Balsamic & Thyme-

Heather shares a basic chickpea flatbread recipe and a whole string of variations, all of which sound scrumptious.

I’m looking forward to working my way through them all.

And then there are the recipes! All recipes are vegan (except the very occasional honey which can easily be swapped out), gluten-free and soy-free. I’ve only had my copy of the book for a few weeks but I’ve already made a lot. My pictures in this post only show half of what I’ve tried and everything I’ve made has been fantastic. Even more than the recipes themselves, I love that there are so many variations listed and ideas for making the recipes your own.

Sweet Potato, Kale & Lentil Stew

Sweet Potato, Kale & Lentil Stew-

This sounds humble and is so easy to put together but produces a seriously tasty meal that I’d happily eat over and over.

Buckwheat Noodle Pad Thai

Buckwheat Noodle Pad Thai-

This is going to be a regular. It’s one of those dishes that tastes far too delicious to be as easy as it is. Perfect for weeknights.

Heather and BenBella Books have generously allowed me to share a recipe from the book as well as hold a WORLDWIDE giveaway for one of you to win a copy of new book! (See bottom of post)

Orange Pepita Granola (Vegan, Gluten-free, Oil-free)

This Orange Pepita Granola is so good, I know you’re all going to love it. If you haven’t made your own granola yet, this one will have you converted. There are just a few ingredients, a short baking time and, best of all, it’s crispy and delicious.

Orange Pepita Granola (Vegan, Gluten-free, Oil-free)

Orange Pepita Granola (Vegan, Gluten-free, Oil-free)

Yield: 10 + Servings

Orange Pepita Granola (Vegan, Gluten-free, Oil-free)

Ingredients

    Wet
  • 3/4 C Maple syrup
  • 1 tsp Vanilla extract
  • Dry
  • 3 C Rolled oats
  • 1 C Shredded coconut
  • 1 C Pumpkin seeds
  • 1 C Almonds, roughly chopped
  • Zest from 2 navel oranges
  • 1 tsp Sea salt
  • Pinch ground cardamom

Instructions

  1. Preheat the oven to 300/150C.
  2. In a small bowl, stir together the wet ingredients.
  3. In a large bowl, toss together dry ingredients
  4. Add wet ingredients to dry and fold well.
  5. Line 2 baking sheets with parchment paper (or just one- you can split the batch, baking one half at a time)
  6. Bake the granola for 20-25 minutes. Granola should look slightly browned and toasted.
  7. Remove from oven and repeat if you are splitting the batch. Granola will harden as it cools.
http://www.coconutandberries.com/2014/10/31/orange-pepita-granola-yum-universe-book-giveaway/

a Rafflecopter giveaway

Yum Universe Review- Healthy Halloween

 Yum Universe is available to order now from Amazon and various other retailers. Check out this page to hear what the author herself has to say about the book and for more information.

If you’re new to Coconut and Berries, please sign up for email updates and join me elsewhere! I’m on FacebookPinterestInstagram (@coconutandberries), Google + and Twitter! You can also follow Coconut and Berries with Bloglovin or Feedly. 


Spooky Spider Web Coconut Cupcakes with Chocolate Ganache (Vegan, Gluten-Free, Grain-Free, Oil-Free)

Coconut Cupcakes with Chocolate Ganache


Spooky Spider Web Coconut Cupcakes with Chocolate Ganache (Vegan, Gluten-Free, Grain-Free, Oil-Free) | coconutandberries.com

I don’t get very excited about Halloween. I’ve never been trick or treating before and I don’t have any memories of carving pumpkins. Children in the UK these days might have a different experience of the holiday but when I was growing up it just wasn’t a big deal. 

I know it’s quite the opposite across the Atlantic and that my US readers have probably been looking forward to the 31st October for weeks! The “spooky spiderweb” decoration on my cupcakes was with my American friends in mind, but everyone, anywhere in the world, can and should make these!

Spooky Spider Web Coconut Cupcakes with Chocolate Ganache (Vegan, Gluten-Free, Grain-Free, Oil-Free) | coconutandberries.com

I think everyone should be able to enjoy a treat and so I tried to cover as many bases as possible by making this recipe, not only vegan, but gluten-free, grain-free, and oil-free (I couldn’t manage nut-free as well this time, sorry!) too!

I was positively jumping up and down when I tried the finished product! Ultra light, ultra fluffy and ultra moist, you really would have NO idea that I’d made these  cupcakes without any of those things.

Spooky Spider Web Coconut Cupcakes with Chocolate Ganache (Vegan, Gluten-Free, Grain-Free, Oil-Free) | coconutandberries.com

Check out that fluffy crumb!

A little shout-out to blogger friend Brandi of The Vegan 8 for introducing me to the magic combination of almond flour and potato starch. The almond flour keeps things moist and rich and the potato starch brings structure and lightness. I’ve done some of my own experimenting and have found that, while tapioca starch and potato starch are *fairly* interchangeable, tapioca can dry baked goods out a little.

Spooky Spider Web Coconut Cupcakes with Chocolate Ganache (Vegan, Gluten-Free, Grain-Free, Oil-Free) | coconutandberries.com

I made these a little coconutty since we all know it’s a favourite flavour of mine, but without coconut extract the coconut flavour is very mild so the recipe would work well as a regular vanilla cupcake too.

I topped them with an easy chocolate ganache, and, instead of a sugary icing, used pure coconut butter to make my spider web design. The pattern isn’t  hard to do and you certainly don’t need any fancy equipment- I simply used a freezer bag (with a tiny end cut off) and a toothpick. Of course you can decorate these any way you like for the appropriate occasion. 

Spooky Spider Web Coconut Cupcakes with Chocolate Ganache (Vegan, Gluten-Free, Grain-Free, Oil-Free)

Yield: 10-12

Spooky Spider Web Coconut Cupcakes with Chocolate Ganache (Vegan, Gluten-Free, Grain-Free, Oil-Free)

Ingredients

    Coconut Cupcakes
  • 1 C (125 g) Almond flour (Ground almonds UK name)
  • 1/2 C (75 g) Potato starch (NOT flour)
  • 1/4 C (20 g) Shredded coconut
  • 2 tsp Baking powder
  • 1/2 tsp Salt
  • 1/2 C Coconut sugar (75g)
  • 1-1/2 tsp Vanilla extract
  • 3/4 tsp Coconut extract (optional)
  • 3/4 C Coconut milk (the kind from a can),well whisked
  • 1/2 C Apple purée/unsweetened applesauce
  • Ganache
  • 80 g/ 3oz Dark chocolate (OR 1/2 C Chocolate chips)
  • 2 Tbsp Coconut milk
  • Coconut butter, melted

Instructions

  1. Preheat oven to 180C/350F and line a cupcake tin with paper/foil cases.
  2. In a large bowl, whisk together all the dry ingredients, making sure there are no lumps remaining.
  3. In another bowl, whisk together the extracts, coconut milk and apple purée.
  4. Add wet ingredients to dry and stir well to combine.
  5. Spoon the batter into the cupcake cases (10-12) and bake for 20 minutes.
  6. Allow to cool for 10 minutes then place the cupcakes on a cooling rack and allow to cool completely before topping.
  7. For the ganache, melt the chocolate in a bain marie or glass bowl placed over a pot of boiling water. Whisk in the coconut milk (it should thicken a little).
  8. Spread the cooled cupcakes with ganache then make the spider web design.
  9. Spoon a few tbsp coconut butter into a freezer bag (or piping bag with a fine nozzle) and allow to cool slightly to thicken a little. Snip a tiny corner off the bag and pipe 3-4 concentric circles on top of the cupcakes. Drag a toothpick from the centre to the edge of the cake at regular intervals through each circle to create the spider web effect.
http://www.coconutandberries.com/2014/10/29/spooky-spider-web-coconut-cupcakes-chocolate-ganache-vegan-gluten-free-grain-free-oil-free/

Spooky Spider Web Coconut Cupcakes with Chocolate Ganache (Vegan, Gluten-Free, Grain-Free, Oil-Free)  

Whether you make these cupcakes for Halloween or for another occasion, I hope you like them as much as me! And please do share your feedback, I love hearing from you.

If you’re new to Coconut and Berries, please sign up for email updates and join me elsewhere!  I’m on FacebookPinterestInstagram (@coconutandberries), Google + and Twitter! You can also follow Coconut and Berries with Bloglovin or Feedly.