Creamy Carob Chia Mousse

DSC_0541.jpg

Stopping by with a little weekend treat for you and an update on how things are going with me. If you read my Lemon-Coconut Fudge Bites post you’ll know I’ve been dealing with some health issues and have been on a mission to get to the bottom of them

Well, I’m pleased to be able to say that some of the problems have completely cleared up! I don’t know if it’s the result of the herbal and supplements prescribed by my naturopath that I’ve been taking, the anti-candida diet (no sugar, fruit, gluten, yeast, fungi, etc. ) that I’ve been following for nearly a month, getting lots of rest, or a combination of everything. Whatever it is, I’m just happy to be feeling so much better! I do still have a lingering problem which hasn’t left me yet but I’m feeling much more optimistic.

Now that’s me out of the way we can move on to something more fun- dessert!

Creamy Carob Chia Pudding

A few things have really helped me not feel deprived on this program, one of them being carob. It seems to have picked up a bad reputation as being a “health food” only eaten by those granola-munching hippie folk, or as an inferior substitute for chocolate. I want to encourage you to throw away those stereotypes and see it in its own right as just another tasty addition to your diet. I does bear some similarity to cocoa but it’s got a natural sweetness that cocoa doesn’t, it also doesn’t contain caffeine which is what makes it suitable for the anti-candida diet.

I guess I have been enjoying carob as a sort of replacement for my beloved dark chocolate. In the UK, Plamil Foods and Siesta both do unsweetened carob bars which are amazing! You can even get mint and orange flavoured ones! But, even if I COULD have chocolate right now I’d be eating carob too, along with this mousse!

Creamy Carob Chia Pudding

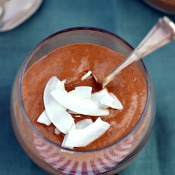
I’ve been enjoying chia puddings for some time now but was introduced to the idea of a blended chia pudding by Dreena Burton. The smooth texture is much more pleasant to me and transforms the pudding into a fluffy, thick mousse! With my newfound love of carob I had to make a carob version. Turns out I wasn’t alone in thinking this was a good idea and Adrienne of Whole New Mom also has a recipe which I’ve adapted here.

I’ve mostly been eating savoury breakfasts at the moment but enjoyed this yummy carob chia mousse one morning for a real treat.

Creamy Carob Chia Mousse

Yield: 2-3 Servings

Ingredients

  • 1 Can/ 1-1/2 C “light” Coconut milk
  • 1/4 C Chia seeds
  • 3 Tbsp (heaped) Carob powder
  • 1/2 tsp Vanilla extract
  • Pinch of Salt
  • 2-3 Tbsp Liquid sweetener (Agave nectar, Maple Syrup, etc.) (I used 1T Yacon syrup + 10 Drops of Stevia as I’m still following the anti-candida diet)

Instructions

  1. If you don’t have a high-powered blender grind the chia seeds to a fine meal in a coffee grinder first. Then add all the ingredients to your blender and blend until very smooth.
  2. Pour into serving bowls and allow to sit in the fridge for at least an hour to thicken up before eating.
http://www.coconutandberries.com/2014/01/10/creamy-carob-chia-mousse/

Do you like carob? Have you actually tried it?

If you’re new to Coconut and Berries, please sign up for email updates and join me elsewhere!  I’m onFacebook,Pinterest,Instagram (@coconutandberries), Google + andTwitter! You can also follow Coconut and Berries with Bloglovin orFeedly.


Lemon-Coconut Fudge Bites

DSC_0428.jpg

Hello again everyone! I’ve missed posting here this last week but wanted to take break and disconnect completely over Christmas. Hope you all had a lovely holiday wherever you are in the world. Things are gradually getting back to normal here, although I’ve still got a week before I head back to my little flat in Bath for the next semester.

Lemon-Coconut Fudge Bites

I may be one of the few who wasn’t eating cookies and desserts aplenty over Christmas, but I promise I’m definitely not feeling smug about it! I would have loved to be eating chocolate and Christmas pudding like everyone else. But I haven’t been feeling my best for a little while now and so I’ve been trying out an anti-candida diet to hopefully bring me back to balance. The diet doesn’t allow any sugars (the only sweeteners I can use are yacon syrup and stevia), including those from fruit,  as well as gluten, dairy, yeast, fungi and a bunch of other things.

For a major sweet tooth like me it has to be said it was a bit of a challenge figuring out what to eat, especially when it came to finding a replacement for my daily post-lunch dark chocolate fix.

Lemon-Coconut Fudge Bites

These zingy little fudge bites are doing the trick of satisfying any sweet cravings nicely, and one is more than enough as they’re pretty rich from the coconut and almond butters.

After chocolate Lemon desserts are always my favourites anyway…

Lemon-Coconut Fudge Bites

Yield: 10 Bites

Ingredients

  • 1/2 C White Almond Butter OR Cashew Butter
  • 3 Tbsp Melted Coconut Butter
  • Zest of one Lemon
  • 3 Tbsp Lemon Juice
  • 1 1/2 Tbsp Liquid Sweetener (Agave nectar, Brown Rice Syrup etc.) I used 1T Yacon Syrup + 5 drops stevia
  • Shredded Coconut for sprinkling

Instructions

  1. Add all ingredients to a glass bowl, except the shredded coconut, and stir well to combine.
  2. Divide between 10 mini silicone moulds OR pour into a dish lined with parchment paper and slice into cubes once set. Sprinkle with shredded coconut and freeze until firm.
  3. These are the perfect consistency straight from the freezer, in the fridge they’re a little too soft for my tastes.
http://www.coconutandberries.com/2013/12/29/lemon-coconut-fudge-bites/

I’m submitting this recipe to the weekly link-up, Wellness Weekends

Lemon-Coconut Fudge Bites

Today I’ve actually discovered there might be another cause of my health problems so I’m praying that’s the case and I can go back to eating normally soon!

In the meantime, what are your favourite  SAVOURY snacks?

If you’re new to Coconut and Berries, please sign up for email updates and join me elsewhere!  I’m on FacebookPinterest,Instagram (@coconutandberries), Google + and Twitter! You can also follow Coconut and Berries with Bloglovin or Feedly.

Gingerbread Cake with Lemon Cashew Cream

DSC_03931.jpg

Gingerbread Cake with Lemon Cashew Cream (GF)

I just did a quick search on my blog and it seems ginger is one of my favourite ingredients, included in all these recipes and more…

Sweet Potato, Spinach & Coconut Dahl

Kabocha, Spinach, Brown Rice & Miso Broth

Ethiopian-Style Yellow Split Pea & Butternut Stew

Tofu, Miso, Udon Noodle Soup

Cauliflower “Fried Rice” with Grilled Asian Tofu

Ginger Cashew Tempeh with Sugar Snap Peas

Double Ginger Choc Chunk Muffins

Does anyone notice something amiss about that list though…?

Only one of them is a sweet recipe!

Gingerbread cookies are probably my favourites and seeing those gingerbread men popping up all over the blogosphere woke up my desire for something gingerbread-y. I would love to make a gingerbread house one day but I think I need to cultivate a little more patience before I attempt to do so. Gingerbread cake sounded like a safe bet instead.

Gingerbread Cake with Lemon Cashew Cream (GF)

This cake is somewhat reminiscent of the “parkin” my Granny used to make- a moist, well-spiced afternoon tea cake. Being me, I couldn’t stop at just the cake and had to top it with something yummy to make it extra special. I’ve always liked lemon and ginger together- I remember making this gorgeous tart a few years ago and adoring it- so a lemon cashew cream it was. This is pretty tangy which suits me, but add more sweetener to your taste. You could also use your favourite cream cheese frosting instead.

Gingerbread Cake with Lemon Cashew Cream

Serving Size: 8-10 pieces

Gingerbread Cake with Lemon Cashew Cream

Ingredients

    Gingerbread Cake:
  • 3/4 C Apple purée (unsweetened applesauce
  • 1/2 C Coconut sugar
  • 2 Tbsp Molasses
  • 3 Tbsp Oil
  • 1 tsp Vanilla Extract
  • 1 C Brown Rice Flour
  • 2 tsp Cinnamon
  • 1 tsp Ground Ginger
  • 1/4 tsp Ground Nutmeg
  • 1/8 tsp Salt
  • 2 Tbsp Cocoa Powder
  • 1 tsp Baking Powder
  • Lemon Cashew Cream:
  • 1 C Cashews, soaked and rinsed
  • 1/3 C Lemon Juice
  • 1/2 C Water (+)
  • 3 Medjool dates OR 2 Tbsp Agave nectar
  • 1/2 Tsp Coconut Oil
  • 1 tsp Vanilla Extract

Instructions

  1. Preheat oven to 180C/350F. Lightly oil a 9” square cake tin.
  2. Whisk together the first 5 ingredients (apple purée through to vanilla)  in a medium bowl. Sift together remaining dry ingredients in another bowl. Add wet to dry and stir to fully combine.
  3. Pour batter into the cake tin. It will be thin but you’re going to stack 2 halves so it needs to be!
  4. Bake for 10-15 minutes until a tester inserted in the centre comes out clean.
  5. Allow to cool fully before frosting.
  6. For the lemon cashew cream, blend all the ingredients in a high-powered blender. You will likely need to scrape down the sides several times. Add more water if your blender is not so strong.
  7. To assemble: Slice the cake vertically in half, spread one half with a generous amount of the cream then stack the other half on top. Cut into squares and top each piece with an extra dollop of cream and a little lemon zest.
http://www.coconutandberries.com/2013/12/20/gingerbread-cake-with-lemon-cashew-cream/

Gingerbread Cake with Lemon Cashew Cream (GF)

I’m hoping to drop by again before Christmas day but until then  I hope everyone’s Christmas preparations are going well and, if you’re already finished with work or studies for the holidays, that you’re enjoying some rest and relaxation!

If you’re new to Coconut and Berries, Please sign up for email updates and join me elsewhere: I’m on Facebook, Pinterest, Instagram (@coconutandberries), Google + and Twitter!

Healthy, No-Bake Cranberry Jam Tarts

Healthy, No-Bake Cranberry Jam Tarts

Healthy, No-Bake Cranberry Jam Tarts

It’s only just occurred to me that many of you are probably not familiar with jam tarts. They’re very traditional in Britain and I have memories of them as a regular childhood treat, especially at birthday tea parties!

Usually a shortcrust pastry topped with a dab of jam and then baked, I always enjoyed them, especially when filled with my favourite- raspberry jam. You had to be patient and leave them to cool though as the jam would turn molten hot in the oven and you’d burn your tongue if you rushed to dig in!

Even if you’ve never tasted them I’m sure many of you have read Alice in Wonderland and might remember the scene with the Queen of Hearts and her jam tarts?

“The Queen of Hearts, she made some tarts all on a summer’s day;

The Knave of Hearts he stole the tarts and took them clean away.

The King of Hearts called for the tarts and beat the Knave full sore

The Knave of Hearts brought back the tarts and vowed he’d steal no more! “

Healthy, No-Bake Cranberry Jam Tarts

My version is a little different to the norm. I went for a variation on my usual nut and date no-bake tart crust instead of the pastry, adding in some oats to cut the richness a tad. With the crust already being sweet I didn’t want a super sweet filling so tangy cranberries were the perfect choice for my quick “jam”. Lightly sweetened with coconut sugar, maple syrup and orange juice it worked wonderfully in these.

I recommend making a double batch of jam as it’s fabulous with plenty of other things: the perfect accompaniment to your Christmas meal, a lovely topper for pancakes or ice cream, swirled into non-dairy yogurt, and I recently discovered that cranberry and hummus are rather a delicious duo too.

Healthy, No-Bake Cranberry Jam Tarts

Healthy, No-Bake Cranberry Jam Tarts:

1C Almonds
1/2C Rolled Oats (not quick-cooking)
3/4C Soft Dates
Pinch of Salt

Quick Cranberry Jam:

1 1/2C Fresh OR Frozen Cranberries
2T Maple Syrup
2T Coconut Sugar
1/4C Orange Juice
1/2C (approx) Water
Zest of half an orange
1/2t Vanilla Extract

Using a food processor, blitz the almonds and oats together to form a fairly fine flour. Add the salt and the dates and process until you have a thick mixture which holds together when pinched between finger and thumb. You may need to add a couple of extra dates if it’s too crumbly.

Divide mixture between the 12 holes of a shallow cake/tartlet tin and press firmly in the base and up the sides to form 12 neat tart shells.

Refrigerate or freeze until ready to fill.

For the jam, place all ingredients except vanilla in a medium saucepan and bring to a simmer. Allow to simmer gently for 10-15 minutes, stirring, until the cranberries have all popped and the jam has thickened up. Pour into a jar and refrigerate until cool. (I left mine chunky but blend with an immersion blender if you prefer yours smooth)

Runn a knife around the edges of the tart shells to loosen them and pop them out of the tin. Fill each with a couple of teaspoons of the jam.

Serve at room temperature

Makes 12

I’m submitting this recipe to the weekly link-up, Wellness Weekends.

Healthy, No-Bake Cranberry Jam Tarts

Anything red and sparkly speaks Christmas to me at the moment so I think these pretty little tarts would be a nice bite-size dessert passed round with Christmas drinks or to accompany your cup of tea on those relaxed afternoons over Christmas.

So tell me, have you had a jam tart before?!

If you’re new to Coconut and Berries, Please sign up for email updates and join me elsewhere: I’m on FacebookPinterest, Instagram (@coconutandberries), Google + and Twitter!

Apple & Raisin Oaty Breakfast Cookies

Apple & Raisin Oaty Breakfast Cookies

I’m back, as promised, with a recipe!

Apple & Raisin Oaty Breakfast Cookies

I don’t talk much about breakfast around these parts. A little odd considering I’m a breakfast devotee. I understand that people are busy in the mornings and don’t have a lot of time to put something on the table, let alone eat, but for me breakfast is like lunch and dinner in that I don’t like to have the same thing day in, day out, even if it is easier to do so.

All the same, it tends to be variations on a theme- porridge, smoothies, muffins…pancakes, etc.

These “breakfast cookies” were borne out of my need for variety. They’re made from typical breakfast ingredients- all wholesome, sustaining, good-for-you things, just in a different form to the norm. I mean, who wouldn’t want to eat cookies for breakfast?!

Apple & Raisin Oaty Breakfast Cookies

I’ve seen quite a few recipes for breakfast cookies around but none of them were what I was looking for- either filled with sugar and definitely not something I’d want to start my day with, or just a bit too virtuous with no added sweetness or fat. My requirements were that they had to be healthy, satisfying AND tasty.

Apple & Raisin Oaty Breakfast Cookies

And so I set out on my mission…The batter looked and tasted good and fortunately the end result didn’t disappoint. After a 30-minute stint in the oven I was greeted with a tray of thick, chewy cookies, just sweet enough and with plenty of goodness to see me through a morning. These are ideal for days when my good intentions fall through and I find myself trying to choke down something whilst getting dressed and packing my bag…I can just grab a couple and run for the bus!

Apple & Raisin Oaty Breakfast Cookies

Apple & Raisin Oaty Breakfast Cookies

Yield: 12 Cookies

Apple & Raisin Oaty Breakfast Cookies

Ingredients

  • Apple & Raisin Oaty Breakfast Cookies:
  • 1 C Unsweetened Apple Purée
  • 1/3 C Almond Butter
  • 3 Tbsp Maple Syrup
  • 1 tsp Vanilla Extract
  • 2 C Rolled Oats (+ more to decorate)
  • 1/2 tsp Cinnamon
  • Large pinch of salt (Omit if your almond butter is salted)
  • 1/2 C Almond Meal (Scant 1C almonds ground in a food processor or spice grinder until a fine meal)
  • 2/3 C Raisins (OR substitute other dried fruit/nuts)

Instructions

  1. Preheat oven to 180C/350F. Line a baking sheet with parchment paper.
  2. In a small bowl, stir apple purée, almond butter, maple syrup and vanilla extract until smooth. In a large bowl, combine oats, cinnamon, salt, almond meal and raisins.
  3. Add wet to dry and stir well so everything is coated.
  4. Using a cookie scoop or 1/4 C measuring cup, scoop batter onto prepared baking sheet. Flatten slightly with moistened fingers and sprinkle with dry oats to decorate.
  5. Bake for 25-30 minutes, or until lightly browned. Allow to cool before removing from baking sheet
http://www.coconutandberries.com/2013/12/04/apple-raisin-oaty-breakfast-cookies/

Apple & Raisin Oaty Breakfast Cookies

Are you a breakfast person? If so, are you happy to eat the same thing every day?

If you’re new to Coconut and Berries, Please sign up for email updates and join me elsewhere: I’m on Facebook, Pinterest, Instagram (@coconutandberries), Google + and Twitter!