Raw Lemon-Lucuma Macaroons

Raw Lemon Lucuma Macaroons

L is for…Lucuma!

This is the first recipe on Coconut and Berries made in my new home! I moved into my own flat just yesterday! I’m having a few internet issues so you’ll have to excuse me for posting later than usual and probably commenting less too.  Hopefully I’ll get things sorted soon so I don’t have to go and pay for tea in a café forever just to blog!

Raw Lemon-Lucuma Macaroons

Lucuma is the sweet fruit from the Peruvian Lucuma Tree. The raw powder can be used as a sweetener in foods and has a delicious caramel maple-y flavour. I first tried it in what is still the best ice cream I’ve ever had- the Raw Lucuma & Pecan Ice Cream from Inspiral Café in Camden, London.

Lucuma is considered a “superfood” since it boasts a variety of nutrients, including vitamins, minerals and fibre. I’m generally a little sceptical of “superfoods” and prefer to just think of them as ingredients like any other, rather than supplements. It just so happens that I love the taste of lucuma which is what has earned it its place in my kitchen, rather than its supposed health benefits.  You’ll have to make your own mind up about it!

Raw Lemon-Lucuma Macaroons

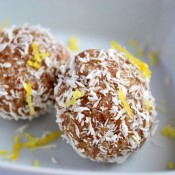
As I’ve just moved in I don’t have any desserts or snacks hanging out in my freezer,  so to keep my sweet tooth happy and to give me a little energy boost whilst I’m sorting I made these Lemon Lucuma Raw Macaroons.

I think the Lucuma, Coconut and Lemon are lovely together and the lemon also prevents these from being too sweet, as raw desserts can be. No cooking or cooling time needed, just whiz everything together in your food processor and you can be enjoying these in 10 minutes.

Raw Lemon-Lucuma Macaroons

Raw Lemon-Lucuma Macaroons:

Even if you don’t believe in “superfoods” these bite-sized treats are still very healthy. They’re satisfying too because of the protein, fat and fibre provided by the almonds, coconut and flax.

1/2C Almonds
1/4C Soft pitted dates
1/2t Vanilla extract
1/2t Lemon extract (if unavailable, add a little extra lemon zest)
Zest of one lemon
1t Lemon juice
1 1/2T Maple Syrup
2T Ground flaxseed
2T Lucuma
1/2C Shredded Coconut (+ 1/4C for rolling)

Pulse almonds in a food processor until coarsely ground. Add dates through to lucuma and process until a sticky dough forms. It should stick together when pinched between finger and thumb.

Add Shredded coconut and pulse briefly to incorporate.

Shape mixture into 12 macaroons and flatten slightly. Roll in remaining shredded coconut.

Makes 12

I’m submitting this recipe to Wellness Weekends and Raw Food Thursdays

These have a great chewy texture and hold together easily too, with no need for any time in the fridge. I’m looking forward to trying other flavours with the same base ingredients and different extracts and add-ins- I think vanilla with cacao nibs,almond, maca, hazelnut and chocolate would all be good.

Raw Lemon-Lucuma Macaroons

Since lucuma is a powder it can be used in so many types of recipes. Here are a few I’ve got my eye on:

Lori and Michelle of Purely Twins have a Cashew Lucuma Frosting recipe that looks divine, especially spread in a thick layer on top of their pumpkin squares.

These Butterscotch-Tahini Bars use lucuma as a main ingredient and look as if they’d taste like “Caramac” bars if anyone remembers those…?

Ricki’s Lucuma-Walnut-Coconut Butter looks like another fabulous speedy recipe. I bet it would be delicious as a dip for crunchy apple slices Smile

As usual, I want to know what you’ve made or want to make with today’s ingredient!

Have you tried Lucuma? What do you think about “superfoods”?

Print

Review: Frank Bars

DSC_0578_thumb.jpg

F is for…Frank Bar!

I’m cheating on my Vegan MoFo A-Z pantry series today…I had planned something else but, although the dish I made was delicious, by dinner time the light had gone so I didn’t get any decent pictures. As I said, it was very tasty so I’ll be sure to make it again and post the recipe after Vegan MoFo.

Anyway, I am still sticking to the planned letter “F” today and bring you a review of a new snack bar on the scene: Frank Bar.

Review: Frank Snack Bars

I’ve told you how I always travel with chocolate, but I always travel with a couple of snack bars in my bag too. As a vegan, it’s still not all that easy to find a good snack if you’re out and about, and even harder to find a healthy one, so I leave the house prepared!

Review: Frank Snack Bars

I was really pleased to discover Frank Bar at the Allergy & Free From Show earlier this summer. They’re 100% natural, made from oats and dried fruit and topped with a delicious dairy-free coconut cream chocolate layer. They’re also entirely free from gluten and nuts, which makes a nice change, as the snack bars I’m used to often have nuts as a main ingredient. Another thing I really liked is that they’re packed with fibre and also contain pea protein which makes them seriously satisfying for their small size.

So how do they taste?

I loved them! The creamy chocolate layer is the perfect foil to the chewy, oaty base. Frank Bars are currently available in 5 flavours:

Review: Frank Snack Bars, Strawberry & Chocolate

Strawberry & Chocolate- If you like chocolate-coated strawberries then you’ll love this one! That’s exactly what it reminded me of.

Review: Frank Snack Bars, Orange & Chocolate

Orange & Chocolate- This was my 2nd favourite as I love orange and chocolate together. Terry’s chocolate orange anyone?!

Review: Frank Snack Bars, Blueberry & Chocolate

Blueberry & Chocolate- The berry flavour really comes through in this one and isn’t dominated by the chocolate as I expected it would be. This one surprised me with how much I liked it.

Review: Frank Snack Bars, Double Chocolate

Double Chocolate- What’s there to say about this one? It’s double chocolate! It’s obviously fantastic!

Review: Frank Snack Bars, Oat & Chocolate

Oat & Chocolate- This was my favourite flavour. It’s slightly different to the others in that the main bar doesn’t have cocoa powder in so there’s more of a contrast between the base and the top chocolate layer (see image below). Maybe choc-chips would be good in it though?

Review: Frank Snack Bars, Nutritional Profile + Ingredients

Here’s the ingredients list and nutritional info so you can see for yourselves how nutritious Frank Bars are. This is the Blueberry & Chocolate flavour but the nutritional profile is pretty much the same for all the flavours. Nearly 4g Protein and 4g Fibre in each 35g bar and only around 120 calories.

Review: Frank Snack Bars

You can find them in various independent stores across England as well as in Planet Organic in London, and online from the Frank Food Co. website. A mixed case of 20 bars- 5 of each flavour- is currently on offer for just £10- that’s only 50p a bar!

Are you a snack bar eater? Which are your favourites?

UK folk, have you tried these yet? If not, ask your local health stores to stock them.


I’ll be back on my pantry A-Z series tomorrow with a recipe for you! Can you guess what the letter “G” will be?

Vegan MoFo Banner

Strawberry-Almond Amazake Muffins

DSC_0108.jpg

Amazake!

This was a product I’d never heard of before but it’s been a great discovery. I introduced it in my review of Clearspring products but if you missed that post or are new to the blog here’s a little intro, in case you’re unfamiliar with it. Strawberry-Almond Amazake Muffins

Amazake is a  Japanese ingredient made from just 3 ingredients- whole grains, water and salt. The traditional Japanese process uses a koji culture to convert the carbohydrates in the grains into simple sugars and magically transform them into these wonderfully thick and creamy dessert.

Traditionally it’s turned into a hot drink combining approx 1/4C with 3/4C hot water. I prefer to make a more creamy, comforting drink simply adding a spoonful into a mug of warm almond milk. I happen to love it straight out of the jar too. You can also blend in fruits, cocoa, extracts and make puddings or smoothies in all kinds of flavours and Clearpring have a whole host of other recipes using amazake on their site.  I decided it would be great to use as a sweetener in baked goods and love slightly sweet muffins for breakfast so the decision was made!

Strawberry-Almond Amazake Muffins

I had picked up even more strawberries than I could eat fresh a few weeks ago and frozen them, a very good decision it turned out as strawberry season’s over here now but I’ve already been missing them. I love the flavour of almonds with fruit so added ground almonds to the mix for flavour and moisture, and a little almond extract to amp up the taste.

Strawberry-Almond Amazake Muffins

Aren’t they pretty?! A wonderfully soft, tender crumb, a puffy top and little jammy bites of sweetness. Just how I like them.

Strawberry-Almond Amazake Muffins

Strawberry-Almond Amazake Muffins:

These are only mildly sweet so perfect for breakfast in my eyes. If you do like your muffins sweet then replace 2-3T of the almond milk with liquid sweetener i.e. agave nectar, brown rice or maple syrup. You can also just serve drizzled with a little agave instead.

1C Light spelt flour
1/2C Ground almonds (These might have a different name outside the UK but here are blanched, finely ground almonds)
2t Baking powder
1/8t Salt
3 1/2T Oil
I  380g/13.5oz Jar Amazake
1/4C Almond milk
1/2t Almond extract
1/2t Vanilla extract
1C Chopped strawberries + 1T Flour
8 Blanched almonds (optional)

Preheat oven to 180C/350F. Line a muffin tray with 8 paper cases.

Combine dry ingredients in a large bowl. In a smaller bowl whisk together amazake, oil, almond milk and extracts. Add wet to dry and stir to combine. Don’t over-mix or you’ll end up with tough muffins. Toss strawberries with 1T flour to prevent them from sinking to the bottom of the muffins and gently fold them into the mixture.

Divide mixture evenly between the paper cases and top with an almond if you like.

Bake for 30-35 minutes, until lightly brown and a toothpick inserted into a muffin comes out clean.

Makes 8

Strawberry-Almond Amazake Muffins

Hannah of Bittersweet even made her own amazake! If you can’t find amazake in grocery stores near you or are just feeling ambitious in the kitchen, why not give it a go?

Strawberry-Almond Amazake Muffins

Is amazake new to you? If not tell me how you like to use it!

Hope everyone’s enjoying the start of MoFo! So happy to be participating this year. I’ll be back with the letter B tomorrow!

Vegan MoFo Banner


Chocolate-Sesame Biscotti

Chocolate-Sesame Biscotti

I shared pictures of these on instagram (@coconutandberries), google+ and facebook  on Saturday and feel a little mean for not having shared the recipe until now… but hopefully you’ll forgive me when you make them!

I do love raw sweets, but sometimes turning on the oven just feels right.

I didn’t actually bake a lot with my Mum growing up, I think our repertoire was limited to fairy cakes and rice krispie squares…but when my brothers and I went to stay with our grandparents, it was a different story. Rainy days were instantly designated as “Baking Days,” something my brothers and I all enjoyed.

After a long spell of sunshine the rain finally came at the weekend and I thought of Granny and our baking Smile . One of my lovely readers had put in a special request for biscotti so the timing seemed even more perfect.

Chocolate-Sesame Biscotti

If you’ve never had biscotti before you’re truly missing out. They are hard and crunchy because they are twice-cooked (‘bis’ is Italian for twice and ‘cotti’ means cooked) and perfect for dipping in a cup of tea or coffee (although apparently true Italians only dip them in Vin Santo, a sweet dessert wine, not coffee). In any case, when I was 19 I spent 6 weeks studying art history in the magical city of Florence, and, although I didn’t pick up the Italian espresso habit, I definitely got into biscotti!

The original recipe is made with almonds and is NOT vegan as it contains eggs (but no butter interestingly). I have made more traditional biscotti in the past but decided to try something different this time, opting for chocolate and sesame. I love the richness that tahini brings here, a perfect pairing with chocolate. I also added sesame seeds to amp up the sesame flavour and for texture, and a few chocolate chips for a little fun too.

Chocolate-Sesame Biscotti

Biscotti-making is not a complicated process and the only real difference to making other cookies is the shaping of the dough into a log and the twice baking.

Chocolate-Sesame Biscotti:

I made a small batch as I wasn’t sure how popular these would be at home, but perhaps I should have doubled it as they were gone in a flash!

(Adapted from Vegan Cookies Invade Your Cookie Jar)

3/4C Light spelt flour (or other flour of your choice)
1/4C Cocoa
1/8t Salt
3/4t Baking powder
1/2C Coconut sugar ( I like to use coconut sugar in my baking as it’s less processed than other sweeteners, it’s also less sweet than refined sugar so these are more chocolatey than super sweet, perfect for this chocolate lover)
2T Tahini
2T Oil (I used rapeseed, but any neutral oil is fine)
1T Ground flaxseed
1/4C Non-dairy milk (You might need 1 or 2 extra tablespoons of milk if your tahini is very thick. Mine is very runny)
2T Sesame Seeds
2T Chocolate Chips (or more! That’s all I had left!)

Preheat oven to 180C/350F

Sift together flour through to baking powder in a large bowl and stir in the coconut sugar. Whisk oil, tahini, ground flax and milk together in a small bowl. Combine wet with dry ingredients and combine with your hands to form a thick dough. Stir through sesame seeds and chocolate chips and shape dough into a ball, pressing chocolate chips back in if they pop out.

On a baking tray lined with parchment paper shape the dough into a rectangular log approximately 4” by 6”. Flatten and square off edges as best as you can.  Bake for 25-30 minutes until log is puffed and firm. Place the baking sheet on a wire rack and leave to cool for 20-30 minutes.

Chocolate-Sesame Biscotti

Preheat oven (again) to a slightly cooler 160C/325F.

Carefully slide the log off the baking tray onto a chopping board. With a sharp, heavy knife, cut the log width-wise into slices, on a diagonal if you like (I forgot!). Carefully return the slices to the baking tray, standing them on their sides (see wire rack picture below). Bake slices again 10-15 minutes on one side, then flip gently and bake a further 10-15 minutes on the reverse side. 15 minutes will give you a slightly crunchier, more authentic biscotti texture, 10 minutes will leave them a little softer. Allow the biscotti to cool for 10 minutes on the baking sheet and then carefully remove to wire racks to complete the cooling. Warm biscotti can be fragile! They should store well in a covered container, if you don’t eat them all!

Makes 10-12

Chocolate-Sesame Biscotti

Chocolate-Sesame Biscotti

Enjoy dunked in a cup of tea ( herbal if you’re me!) or coffee, or if you want to be authentic, after a meal with vin santo!

Chocolate-Sesame Biscotti

Have you tried or made biscotti? What flavour would you like to see?

Broad Bean + Roasted Garlic Dip

defaultthumbnail

Broad Bean (Fava Bean) + Roasted Garlic Dip

As much as I love to be in the kitchen, for almost everyone, myself included, it’s just not feasible to spend a huge amount of time preparing meals on a day-to-day basis. I almost always carve out some precious time in the evenings to prepare a nice dinner, and at weekends might make a special breakfast, but lunch tends to be variations on a theme- quick, light meals I can eat for a few days in a row. I’ve shared a few recipes for satisfying bean/grain salads on the blog already- a typical lunch for me. But besides salads, and leftovers, you’ll almost always find some sort of dip in my fridge.

Hummus is probably a staple in most vegans’ diets! It’s certainly one of those foods which deserves the tittle “nutritious and delicious”. I frequently whip up a batch of the traditional stuff but, if you know me you’ll realize It’s rare that I repeat the same dish too many times as I have to much fun making and inventing new ones! This broad bean and roasted garlic dip is a lovely alternative to the usual hummus and just as easy to prepare.

Roasted Garlic

For some depth I added roasted garlic to my dip. If you’ve never tried garlic this way I urge you to do so asap. It’s a different flavour altogether to raw or even sautéed garlic. The sharp, pungent taste mellows completely and it turns caramel-like, sweet and spreadable, and, even better, no garlic breath! When making roasted vegetables I often toss a few whole cloves to the mix, still in their skins, and then squeeze out the sticky garlic when cooked and mix it with the other vegetables.

Fresh Fava Beans

Broad beans are another vegetable we tend to think of here as a classic summer ingredient. I love how creamy and perfect they look popped out of their thick pods. They always remind me of a song we sang at school when I was little “..the apples are ripe, the plums are red…the broad beans are sleeping in their blankety bed” and while I was shelling them I noticed that the pods were indeed lined with a kind of velvety “blanket”!

Anyway, we went to a local pick-your-own-farm recently to get a load of berries and I couldn’t resist filling a basket with fresh broad beans at the same time. I’ve never really cooked with them before so this was my easy, but delicious solution. If you’ve got any other ideas for using the fresh beans please do share in the comments!

Broad Bean + Roasted Garlic Dip:

Bear in mind when buying fresh broad beans that after shelling them you’re left with a fairly small amount. I recommend buying more than you think you’ll need!

200g/1/2lb Shelled Broad Beans
1 Small bulb of garlic
2T Extra-virgin olive oil
Zest of 1 small lemon
2T Lemon juice
5 Medium basil leaves
Salt + pepper

Preheat oven to 180C/350F. Slice whole bulb of garlic in half width-wise across its centre and place, exposed side up on a baking tray. Drizzle with olive oil and cook for 20-30 minutes. It should be soft throughout and slightly brown. Be careful not to let it burn though- you want caramel not char. Set aside until cool enough to handle.

Meanwhile you can be getting on with shelling your beans. When they’re podded steam them for 3-5 minutes and plunge into cold water. Remove the thick skins from the beans. Just pinch the skin with your fingers and they should pop out easily.

Squeeze as much of the garlic as you can out of the skins and blend together with all the other ingredients In a food processor. Season to taste.
Serve at room temperature with raw vegetable sticks, wholegrain bread, pita or crackers.

I’m submitting this recipe to the weekly blog hop Wellness Weekends

What are your favourite easy lunches?