Gingerbread Cake with Lemon Cashew Cream

DSC_03931.jpg

Gingerbread Cake with Lemon Cashew Cream (GF)

I just did a quick search on my blog and it seems ginger is one of my favourite ingredients, included in all these recipes and more…

Sweet Potato, Spinach & Coconut Dahl

Kabocha, Spinach, Brown Rice & Miso Broth

Ethiopian-Style Yellow Split Pea & Butternut Stew

Tofu, Miso, Udon Noodle Soup

Cauliflower “Fried Rice” with Grilled Asian Tofu

Ginger Cashew Tempeh with Sugar Snap Peas

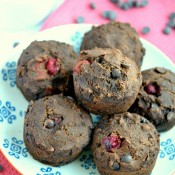
Double Ginger Choc Chunk Muffins

Does anyone notice something amiss about that list though…?

Only one of them is a sweet recipe!

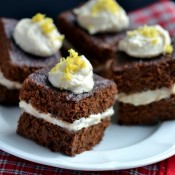
Gingerbread cookies are probably my favourites and seeing those gingerbread men popping up all over the blogosphere woke up my desire for something gingerbread-y. I would love to make a gingerbread house one day but I think I need to cultivate a little more patience before I attempt to do so. Gingerbread cake sounded like a safe bet instead.

Gingerbread Cake with Lemon Cashew Cream (GF)

This cake is somewhat reminiscent of the “parkin” my Granny used to make- a moist, well-spiced afternoon tea cake. Being me, I couldn’t stop at just the cake and had to top it with something yummy to make it extra special. I’ve always liked lemon and ginger together- I remember making this gorgeous tart a few years ago and adoring it- so a lemon cashew cream it was. This is pretty tangy which suits me, but add more sweetener to your taste. You could also use your favourite cream cheese frosting instead.

Gingerbread Cake with Lemon Cashew Cream

Serving Size: 8-10 pieces

Gingerbread Cake with Lemon Cashew Cream

Ingredients

    Gingerbread Cake:
  • 3/4 C Apple purée (unsweetened applesauce
  • 1/2 C Coconut sugar
  • 2 Tbsp Molasses
  • 3 Tbsp Oil
  • 1 tsp Vanilla Extract
  • 1 C Brown Rice Flour
  • 2 tsp Cinnamon
  • 1 tsp Ground Ginger
  • 1/4 tsp Ground Nutmeg
  • 1/8 tsp Salt
  • 2 Tbsp Cocoa Powder
  • 1 tsp Baking Powder
  • Lemon Cashew Cream:
  • 1 C Cashews, soaked and rinsed
  • 1/3 C Lemon Juice
  • 1/2 C Water (+)
  • 3 Medjool dates OR 2 Tbsp Agave nectar
  • 1/2 Tsp Coconut Oil
  • 1 tsp Vanilla Extract

Instructions

  1. Preheat oven to 180C/350F. Lightly oil a 9” square cake tin.
  2. Whisk together the first 5 ingredients (apple purée through to vanilla)  in a medium bowl. Sift together remaining dry ingredients in another bowl. Add wet to dry and stir to fully combine.
  3. Pour batter into the cake tin. It will be thin but you’re going to stack 2 halves so it needs to be!
  4. Bake for 10-15 minutes until a tester inserted in the centre comes out clean.
  5. Allow to cool fully before frosting.
  6. For the lemon cashew cream, blend all the ingredients in a high-powered blender. You will likely need to scrape down the sides several times. Add more water if your blender is not so strong.
  7. To assemble: Slice the cake vertically in half, spread one half with a generous amount of the cream then stack the other half on top. Cut into squares and top each piece with an extra dollop of cream and a little lemon zest.
http://www.coconutandberries.com/2013/12/20/gingerbread-cake-with-lemon-cashew-cream/

Gingerbread Cake with Lemon Cashew Cream (GF)

I’m hoping to drop by again before Christmas day but until then  I hope everyone’s Christmas preparations are going well and, if you’re already finished with work or studies for the holidays, that you’re enjoying some rest and relaxation!

If you’re new to Coconut and Berries, Please sign up for email updates and join me elsewhere: I’m on Facebook, Pinterest, Instagram (@coconutandberries), Google + and Twitter!

Chocolate Pumpkin & Cranberry Muffins (GF)

Chocolate Pumpkin & Cranberry Muffins

Congratulations to Nicola who is the winner of the “tibits at home” cookbook, selected via a random number generator. Thanks to everyone who entered! There are more giveaways coming up, so hold tight and you might get lucky next time.

Chocolate Pumpkin & Cranberry Muffins | coconutandberries.com

There’s a festive feel in the air! While the Americans are gearing up for Thanksgiving, here in the UK we’re jumping ahead and getting ready for Christmas already. It’s not much more than a month to go! The Christmas lights were turned on in Bath last week, mince pies and advent calendars are appearing and late night Christmas shopping has begun.

These muffins felt rather in spirit to me. Pumpkin is of course a seasonal classic, well not really here but I read a lot of blogs where there’s a bit of a craze for all things pumpkin (!).  After making Dreena’s fantastic Pumpkin Pie, I’ve decided we definitely need to work pumpkin into our Christmas traditions somehow.

Everything’s been about chocolate for me lately so I added a dose of cocoa along with a handful of chocolate chips to the batter and studded them with fresh cranberries for that sparkly touch.

Chocolate Pumpkin & Cranberry Muffins | coconutandberries.com

I haven’t done a lot of gluten-free baking up to this point but I like to challenge myself in the kitchen and I’ve been learning more about gluten-free baking from Ricki Heller’s “Naturally Sweet & Gluten-Free”- a gorgeous vegan baking book whose recipes are exclusively gluten-free, as well as free from refined sugars.

When I saw that Ricki was holding a recipe contest to find 5 recipes to be included in a a special winter supplement to the new cookbook, I jumped at the opportunity to try something new. In keeping with the recipes in the book, submissions had to be vegan, gluten-free and use only lower glycemic sweeteners.

Chocolate Pumpkin & Cranberry Muffins | coconutandberries.com

I did some research and then got to work.  I used an all-purpose gluten-free flour mix along with psyllium husk as a binder and the muffins came out lovely and soft with a nice springy crumb and decent rise. They were no more difficult to make than typical gluten-filled baked goods either.

Chocolate Pumpkin & Cranberry Muffins (GF)

Yield: 6 medium-size muffins

Ingredients

  • 1/2 C Pumpkin Purée
  • 3/4 C Non-dairy Milk
  • 2 Tbsp Psyllium Husks
  • 3 Tbsp Melted Coconut oil (or other neutral oil)
  • 1/3 C Coconut Sugar
  • 1/4 tsp Liquid Stevia (optional, for extra sweetness)
  • 1/2 tsp Vanilla
  • 3/4 C All-Purpose Gluten-free Flour Mix
  • 3T Cocoa Powder
  • 1/2 tsp Baking Soda/Bicarbonate of Soda
  • 1/2 tsp Baking Powder
  • 1/8 tsp Salt
  • 1/4 tsp Cinnamon
  • 1/4 C Dairy-free Chocolate Chips OR Unsweetened Carob Chips
  • 1/3 C Fresh OR Frozen OR Dried Cranberries (If using frozen do not thaw first)

Instructions

  1. Preheat oven to 180C/350F. Lightly oil a 6-hole muffin tray or line with paper cases.
  2. In a medium bowl, whisk together the first seven ingredients, pumpkin through to vanilla.
  3. In a large bowl, sift together the flour, cocoa, baking powder, baking soda, salt and cinnamon.
  4. Add the wet ingredients to the dry and stir just to blend. Do not over-mix. Gently fold through the chocolate chips and cranberries. The batter will be very thick.
  5. Using a lightly oiled cookie scoop, distribute batter evenly between the muffin cups (they should be about 3/4 full). Smooth tops a little if necessary.
  6. Bake for 25-30 minutes, or until a tester comes out clean. Allow to cool completely before removing from the pan.
http://www.coconutandberries.com/2013/11/21/chocolate-pumpkin-cranberry-muffins-gf/

Chocolate Pumpkin & Cranberry Muffins | coconutandberries.com

Are you an experienced gluten-free baker? Any tips to share with the rest of us?

What’s putting you in the festive spirit right now?

If you try these Chocolate Pumpkin & Cranberry Muffins and are on Instagram,  I’d love it if you shared a picture! Please tage me #coconutandberries and @coconutandberries so I don’t miss it. Thank you!

 If you’re new to Coconut and Berries, please sign up for email updates and join me elsewhere!  I’m on FacebookPinterestInstagram (@coconutandberries), Google + and Twitter! You can also follow Coconut and Berries with Bloglovin or Feedly.

Creamy White Bean Pasta with Mushrooms & Sage

DSC_0488.jpg

Creamy White Bean Pasta with Mushrooms & Sage

It’s Bonfire night! Since the 5th is a weekday this year, most of the fireworks displays took place over the weekend when it was, predictably, raining.

Bonfire night always seems to signal the real start of Autumn weather and indeed the temperature has certainly dropped these last couple of days. I’m back on porridge for breakfast and looking for warming meals to fill my tummy after coming in from the cold.

Creamy White Bean Pasta with Mushrooms & Sage

I don’t eat pasta all that often these days. I think maybe I had my fill of it when I was younger when plain pasta was one of the few meals fussy little me liked. I tend to think of it as boring and not particularly nutritious, but I’m realizing that it doesn’t have to be so. Add some beans, greens and wintry herbs and you’ve got a tasty, healthy, and satisfying meal.

I know this dish doesn’t look terribly inspiring but I promise it tastes a lot better than it looks. The creamy sauce is made from white beans and packs a punch of protein as well as bringing the herby mushrooms, pasta and kale together nicely.

Creamy White Bean Pasta with Mushrooms & Sage

Creamy White Bean Pasta with Mushrooms & Sage:

Pasta for 4 people (I like Dove’s Farm Brown Rice Pasta)

1/2T Olive Oil
1 Small Onion
2 Cloves of Garlic
1C White Beans
1T White Miso
1T Lemon Juice
1 1/2C Vegetable Broth
1/2T Olive Oil
250g/8oz Mushrooms, wiped clean and sliced thickly
2T Minced Fresh Sage
Salt & Pepper
A few large handfuls of kale or other greens, chopped

Make the white bean sauce first. Sauté onion over medium heat for 5 minutes in the olive oil, add the garlic and continue to cook for a further couple of minutes.

If you have an immersion blender add the beans, broth, miso and lemon juice to the pot and blend until smooth. Alternatively, transfer onion mixture to a blender, add the other ingredients and blend until smooth. Return to pot and heat gently until warmed through. Add more broth if you prefer a thinner sauce.

Cook pasta according to packet directions.

While the pasta is cooking, heat the remaining olive oil in a pan and sauté mushrooms along with the sage for approx 5 minutes, or until they’ve released their juices. Season with salt and pepper.

Steam greens.

Either add everything to the pasta and mix well to coat with the sauce or layer the separate components on individual plates.

Serves 4

Creamy White Bean Pasta with Mushrooms & Sage

I’ve got so much I want to share with you but am lacking the time to post it at the moment. I hope you’ll all bear with me!

What are your favourite pasta-dishes?

Sign up for email updates and join me elsewhere: I’m on Facebook, Pinterest, Instagram (@coconutandberries), Google + and Twitter!

Chocolate-Orange-Goji Cookies

Chocolate-Orange-Goji Cookies

Hurrah, it’s Friday!

I’m dropping in with an easy, tasty cookie recipe for you to make over the weekend.

This was inspired by The Raw Chocolate Co’s award-winning Goji & Orange Raw Chocolate. I was lucky enough to sample a whole load of their products recently and fell in love with this flavour in particular. Chocolate-orange is a classic of course, but the addition of goji berries adds a little something extra to these cookies.

Even if you’re not too sure about gojis on their own (I’m not!) they really are yummy here, trust me on this one! The Raw Chocolate Co’s Chocolate-covered Goji Berries are also pretty delicious.

Chocolate-Orange-Goji Cookies | coconutandberries.com

These Chocolate-Orange-Goji Cookies are made from all good-for-you ingredients, are gluten-free, and can be either raw or baked! They have a lovely chewy texture, rich chocolatey taste with fruity undercurrents from the orange and gojis. I know you’re going to love them!

Chocolate-Orange-Goji Cookies | coconutandberries.com

Chocolate-Orange-Goji Cookies (*No-Bake or Baked):

Yield: 7-10 small cookies

Ingredients

  • 1 C Nuts (I used 1/2C Walnuts, 1/2C Almonds but most should be fine)
  • 1 Tbsp Ground flaxseed
  • 2 Tbsp Cocoa
  • Zest of 1 large orange
  • 1/4 C Brown rice flour
  • 1/4 tsp Baking soda
  • 1/8 tsp Salt
  • 2 1/2-3Tbsp Agave nectar
  • 3 Tbsp Goji berries

Instructions

  1. Preheat oven to 180C/350F. Line a baking sheet with parchment paper.
  2. Using a food processor, process nuts, ground flaxseed, cocoa, orange zest, flour, baking soda and salt until a fine meal. Careful not to over-process though. Add the agave nectar, starting off with 2 1/2 Tbsp. Process again until the mixture holds together when squeezed between your fingers. If it still looks a little dry (will depend on the variety of nuts used) add the remaining 1/2 Tbsp of agave and process again. Finally, add the goji berries and pulse two or three times to incorporate. 
  3. Roll balls of dough with your fingers (approx 1 heaping Tbsp each), flatten into a cookie shape and place on your prepared baking sheet about 2” apart.
  4. They should look like the below picture- not too wet, not too dry.
  5. Bake for 8-10 minutes until the cookies are dry on top. Allow to cool completely before removing from the baking sheet (they firm up as they cool).

Notes

*Note: For no-bake cookies, omit the baking soda and, either roll into balls and refrigerate or press into a container, refrigerate, and cut into squares.

http://www.coconutandberries.com/2013/10/25/chocolate-orange-goji-cookies/

Chocolate-Orange-Goji Cookies | coconutandberries.com

I’m submitting this recipe to the weekly link-parties, Wellness Weekends and Healthy Vegan Fridays

Chocolate-Orange-Goji Cookies | coconutandberries.com

What’s cooking in your kitchen this weekend?

My followers on instagram get sneak previews of blog recipes so if you’re not following me over there yet, please do (@coconutandberries)! Let me know who you are too so I can follow you back and if you make these cookies share your pics with the #coconutandberries so I can see them!

If you’re new to Coconut and Berries, Please sign up for email updates and join me elsewhere: I’m on FacebookPinterest, Instagram (@coconutandberries), Google + and Twitter!

Follow Coconut and Berries with Bloglovin or Feedly

Thai Tempeh & Vegetable Red Curry

DSC_0015.jpg

After 4 years of university when (fairly infrequent) classes and lectures were no more than 5 minutes away by bike, followed by a long summer break free of any commitments, you could say I’m used to having plenty of time for cooking and being able to do so when I want.

Thai Tempeh & Vegetable Red Curry

Now, however, things are a little different. I still do work a lot from home, but I have to travel to get to my classes and sometimes spend all day on campus and then have to face bus queues and the ride home. I certainly have a new found appreciation of what the real world is like! After a long day of work and arriving home hungry, the last thing I want to do is think about putting together an elaborate meal.

If, even I, the self-proclaimed cooking lover, feels like this, then what must the majority of the world’s population working 9-5 jobs feel like?!

Thai Tempeh & Vegetable Red Curry

Ruling out the easy option of packaged ready meals from the outset, which are typically unhealthy, expensive and, most importantly to me, just don’t taste good (!), I’ve been trying to come up with some quick meals which don’t require much effort, ideal for the aforementioned evenings.

This Thai Tempeh & Vegetable Red Curry ticked all the boxes- easy, speedy and nourishing! In fact, if it weren’t for the rice I served with it, this could be on the table in 15 minutes.

I even made sure there was minimal chopping involved!

Thai Tempeh & Vegetable Red Curry

Feel free to use whatever vegetables on hand- bell peppers, courgettes and aubergine would also be nice. Of course you’ve got more chopping involved with those choices though…

Thai Tempeh & Vegetable Red Curry

Yield: 2 Servings

Ingredients

  • 1 Tbsp Coconut oil (divided)
  • 1/2 8oz Pkg Tempeh, cut into triangles or cubes (I used a variety with sea vegetables, hence the black bits…)
  • 1 1/2-2 Tbsp Red curry paste (check the label for shellfish!)
  • 3/4 C/1/2 Can Coconut milk
  • 1/2 Tbsp Tamari
  • 1/2 Tbsp Coconut sugar
  • 1 Tbsp Lime juice
  • 100g/3.5oz/1 1/2 C Halved mushrooms
  • 100g/3.5oz Sugar snap peas
  • 100g/3.5oz Baby corn, halved lengthwise
  • Handful of Thai basil (you could also use fresh coriander but Thai basil is really really good!)

Instructions

  1. If you’re cooking rice, make sure to get that going before you do anything else.
  2. Sauté the tempeh in 1/2 Tbsp Coconut oil over medium-high heat, flipping to get it brown on all sides.
  3. Heat the remaining 1/2 Tbsp coconut oil in a pot over medium heat and add the red curry paste. Stir for a minute just to toast the spices and bring the flavours out.
  4. Stir through the coconut milk, tamari, coconut sugar and lime.
  5. Add vegetables, cover, and simmer for about 5 minutes, just until vegetables are tender. Stir through the Thai basil leaves and the tempeh and simmer for another minute just to warm through the tempeh.
  6. Serve with brown rice, rice noodles or another grain.
http://www.coconutandberries.com/2013/10/21/thai-tempeh-vegetable-red-curry/

Thai Tempeh & Vegetable Red Curry

Preparation tends to be a big help in getting meals on the table speedily. Here are a few of my top tips:

-Cook a big batch of grains and beans at the weekend to use throughout the week.

-Make a dressing, and/or sauce, and a dip. Again, these will last you all week and mean you can jazz up a side salad to go with your meal or a simple bowl of grains, veggies and beans. If I’m starving when I get in I also like to munch on some carrot sticks and hummus (or other homemade dip) while I prep dinner.

-Have a well-stocked pantry. Although my preference is for cooking beans from scratch, sometimes I forget to soak them and it’s useful to have a few cans on hand. Along with dried beans, lentils, grains, pasta and noodles, dried fruit and nuts, other ingredients I stock are canned tomatoes, coconut milk and silken tofu (for noodle soups, sauces and desserts).

-Don’t forget the spices. Having a wide range of spices might seem unnecessary but it’s the way to go to add a lot of flavour to your dishes, without long simmering or roasting.

-Wash and chop your vegetables in advance. Supermarkets these days are doing a roaring trade in prepared vegetables, unsurprisingly as this is another time-zapper. These are always more expensive than the whole vegetables though and if you dedicate half an hour of time to chopping up vegetables in advance you’ll be amazed at how much quicker your meals come together. Most vegetables can be chopped in advance and stored in a covered container in the fridge. For vegetables I won’t be cooking and which I want to stay crunchy, I cover them in cold water and store them like that.

-Use your freezer. For when I really don’t want to cook I make use of my own freezer meals! Sometimes I cook enough for a few meals, and even if I don’t want to eat the same thing 3 days in a row, I store the leftovers in the freezer. Just get out whatever it is in the morning and let it defrost ready for you to simply re-heat and eat in the evening.

And of course….

-Meal-Plan. This makes life SO much easier. Knowing what you want to eat the week ahead means you’ll have all the ingredients you need on hand and not be left with a growling tummy staring blankly into an empty fridge come dinner time! Set aside an hour a week to go through those recipes you’ve saved online and/or your cookbooks, and pick a few you want to try that week. Write them down along with a list of anything you need to buy.

DSC_0017

That’s all I can think of right now but please do share your own tips in the comments.

Do you have any super speedy, healthy meals to share?

Sign up for email updates and join me elsewhere: I’m on Facebook, Pinterest, Instagram (@coconutandberries), Google + and Twitter!