Coconut and Berries

Healthy, Vegan Recipes by Emma Potts

  • 
  • 
  • 
  • 
  • 
  • Home
  • About
  • Contact
  • Recipes
    • All Recipes
    • Beverage
    • Breakfast
    • Dessert
    • Dips and Sauces
    • Main Dish
    • Salads
    • Snacks
    • Sides and Starters
    • Raw
  • Press
  • Inspiration
  • Reviews
    • Product Reviews
    • Restaurant Reviews
    • Cookbook Reviews
    • Recipe Reviews

Healthy, No-Bake Cranberry Jam Tarts

Healthy, No-Bake Cranberry Jam Tarts

Healthy, No-Bake Cranberry Jam Tarts

It’s only just occurred to me that many of you are probably not familiar with jam tarts. They’re very traditional in Britain and I have memories of them as a regular childhood treat, especially at birthday tea parties!

Usually a shortcrust pastry topped with a dab of jam and then baked, I always enjoyed them, especially when filled with my favourite- raspberry jam. You had to be patient and leave them to cool though as the jam would turn molten hot in the oven and you’d burn your tongue if you rushed to dig in!

Even if you’ve never tasted them I’m sure many of you have read Alice in Wonderland and might remember the scene with the Queen of Hearts and her jam tarts?

“The Queen of Hearts, she made some tarts all on a summer’s day;

The Knave of Hearts he stole the tarts and took them clean away.

The King of Hearts called for the tarts and beat the Knave full sore

The Knave of Hearts brought back the tarts and vowed he’d steal no more! “

Healthy, No-Bake Cranberry Jam Tarts

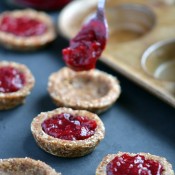
My version is a little different to the norm. I went for a variation on my usual nut and date no-bake tart crust instead of the pastry, adding in some oats to cut the richness a tad. With the crust already being sweet I didn’t want a super sweet filling so tangy cranberries were the perfect choice for my quick “jam”. Lightly sweetened with coconut sugar, maple syrup and orange juice it worked wonderfully in these.

I recommend making a double batch of jam as it’s fabulous with plenty of other things: the perfect accompaniment to your Christmas meal, a lovely topper for pancakes or ice cream, swirled into non-dairy yogurt, and I recently discovered that cranberry and hummus are rather a delicious duo too.

Healthy, No-Bake Cranberry Jam Tarts

Healthy, No-Bake Cranberry Jam Tarts:

1C Almonds
1/2C Rolled Oats (not quick-cooking)
3/4C Soft Dates
Pinch of Salt

Quick Cranberry Jam:

1 1/2C Fresh OR Frozen Cranberries
2T Maple Syrup
2T Coconut Sugar
1/4C Orange Juice
1/2C (approx) Water
Zest of half an orange
1/2t Vanilla Extract

Using a food processor, blitz the almonds and oats together to form a fairly fine flour. Add the salt and the dates and process until you have a thick mixture which holds together when pinched between finger and thumb. You may need to add a couple of extra dates if it’s too crumbly.

Divide mixture between the 12 holes of a shallow cake/tartlet tin and press firmly in the base and up the sides to form 12 neat tart shells.

Refrigerate or freeze until ready to fill.

For the jam, place all ingredients except vanilla in a medium saucepan and bring to a simmer. Allow to simmer gently for 10-15 minutes, stirring, until the cranberries have all popped and the jam has thickened up. Pour into a jar and refrigerate until cool. (I left mine chunky but blend with an immersion blender if you prefer yours smooth)

Runn a knife around the edges of the tart shells to loosen them and pop them out of the tin. Fill each with a couple of teaspoons of the jam.

Serve at room temperature

Makes 12

I’m submitting this recipe to the weekly link-up, Wellness Weekends.

Healthy, No-Bake Cranberry Jam Tarts

Anything red and sparkly speaks Christmas to me at the moment so I think these pretty little tarts would be a nice bite-size dessert passed round with Christmas drinks or to accompany your cup of tea on those relaxed afternoons over Christmas.

So tell me, have you had a jam tart before?!

If you’re new to Coconut and Berries, Please sign up for email updates and join me elsewhere: I’m on Facebook, Pinterest, Instagram (@coconutandberries), Google + and Twitter!

December 15, 2013 —

Butternut, Barley & Lentil Pilaf

Butternut, Barley & Lentil Pilaf

Hope everyone had fun at the Virtual Vegan Potluck at the weekend! I was happy to bring my dessert along to the party and enjoyed seeing what everyone else came up with.

Butternut, Barley & Lentil Pilaf

I’d been doing well so far this autumn in avoiding any lurgies but I finally succumbed to a cold over the weekend- I’m blaming my Mum who came to visit last week, and she’s apparently blaming her boyfriend (Thanks James!). It takes a lot to keep me out of the kitchen but admittedly my energy was pretty zapped and cooking wasn’t high on the list of things I felt like doing at the weekend.

All the same, a girl’s got to eat- “feed a cold” and all that. Not to mention I wanted to share a new dish with you today, so I pulled myself to my feet and into the kitchen, and this is what I came up with.

Butternut, Barley & Lentil Pilaf

I don’t know anyone who doesn’t like  roasted squash. It’s probably the highlight of the season’s vegetables for me. Roasted with spices and olive oil then combined with chewy barley, lentils, a few extra accents and a sweet and tangy dressing, this really hit the spot. I made a large batch too so if my energy levels are dragged down this week I’m good to go with a nutritious meal waiting for me in the fridge.

Since the blogosphere is abuzz with talk of Thanksgiving, not much more than a week away (!), I couldn’t help but think of my American readers when making this dish. It would be a good one to serve on the big day- colourful, vibrant, tasty: a guaranteed crowd-pleaser.

Butternut, Barley & Lentil Pilaf

Print
Butternut, Barley & Lentil Pilaf

Yield: 4 servings as a main, 6-8 as a side

Ingredients

    Pilaf:
  • 1/2 C Pearl barley (For GF use Brown/Wild Rice or another hearty GF grain)
  • 1/2 C Puy lentils
  • Small Butternut squash (approx 680g/1 1/2lb), peeled and cubed
  • 1 Tbsp Olive oil
  • 1/2 tsp Ground cumin
  • 1/2 tsp Ground coriander
  • 1/4 tsp Cinnamon
  • 1/4 tsp Garlic powder
  • Large pinch of salt
  • 1/3 C Raisins
  • 1/3 C Pumpkin seeds, toasted (reserve 1-2 Tbsp for topping)
  • 1/3 C Finely chopped red onion
  • 1/2 C Roughly chopped parsley
  • Dressing:
  • 3 Tbsp Orange Juice (fresh)
  • 1 Tbsp Red Wine Vinegar
  • 1 Tbsp Extra-virgin Olive Oil
  • Salt + Pepper (to taste)

Instructions

  1. Preheat oven to 200C/400F
  2. Cook lentils & barley in two separate pots according to package instructions. Barley typically takes 40-45 minutes and Puy lentils approx 25 minutes. When al dente, drain and set aside.
  3. In a large mixing bowl, combine cubed squash with olive oil, spices and a large pinch of salt. Spread in a layer on a baking sheet and roast for approx 25 minutes, or until soft when pierced with a fork.
  4. Meanwhile, whisk together the dressing ingredients and add to barley and lentils along with the raisins, pumpkin seeds and red onion. Toss well.
  5. Finally, fold through the roasted butternut and the parsley, transfer to a serving dish and scatter the remaining pumpkin seeds on top.
3.1
http://www.coconutandberries.com/2013/11/18/butternut-barley-lentil-pilaf/

Butternut, Barley & Lentil Pilaf

Are my US readers ready with your menus for Thanksgiving yet? What will you be making?

If you’re new to Coconut and Berries, Please sign up for email updates and join me elsewhere: I’m on Facebook, Pinterest, Instagram (@coconutandberries), Google + and Twitter!

November 18, 2013 —

Vegan Crepes with Date & Orange Compote and Cinnamon Ice-Cream

Vegan Crepes with Date & Orange Compote and Cinnamon Ice-Cream

So excited to be part of the Virtual Vegan Potluck this year! I’ve only ever been to one potluck in “real life” before, but had such a great time that I think I need to organize some myself.

I hope you’ve saved some room for dessert because I’ve got a real treat in store for you!

Vegan Crepes with Date & Orange Compote & Cinnamon Ice-Cream

As this is a party I figured I’d go all out with something a little special- I put together a few things for a mighty feast- Vegan Crêpes filled with Date & Orange Compote and “supremed” oranges (as we’re feeling fancy…). All topped off with a creamy cinnamon ice cream.

There are a few components to this dessert but they’re not time-consuming or difficult. You don’t have to make them all either. The crêpes and compote would still be delicious with vanilla ice cream and a sprinkle of cinnamon or just make the quick compote and serve with ice cream if you don’t fancy making crêpes. Lots of options!

Vegan Crepes with Date & Orange Compote & Cinnamon Ice-Cream

I was pretty pleased with how the crêpes turned out. I haven’t had much success in the past but scouted around online and combined a few recipes to come up with this one.

As for the compote- just a couple of ingredients simmered in a pan for 10 minutes turn into something magical. If you’re a long-time reader you’ll know how much I like to use dates in desserts. I love their caramel flavour and natural sweetness.

You don’t even need an ice-cream maker for this ice-cream! I learnt a nifty technique (see below) from blogger and cookbook author Ricki Heller- a life-changer for sure! This recipe is minimally adapted from the “Chai Ice-Cream” in her wonderful new book, Naturally Sweet and Gluten-Free.

Vegan Crepes with Date & Orange Compote & Cinnamon Ice-Cream

Date & Orange Compote:

1 C (lightly packed)Dates, pitted and chopped
Juice of 1 Orange
Zest of 1/2 Orange
1 Tbsp Lemon Juice
1/2 C Water

Combine all ingredients in a small pan and simmer over medium-low heat until thickened and dates have broken down (10-15 minutes). Set aside to cool.

Cinnamon Ice Cream:

1/2 C Cashews
1 C Canned Coconut Milk (full-fat)
1 C Non-dairy milk
1 Medium Banana
1/4 C Agave Nectar
10 Drops of Stevia, or to taste (optional)
1 Tbsp Cinnamon
Pinch of Salt

If using an ice-cream maker, set it up according to the manufacturer’s directions. Otherwise, set 6-8 silicone muffin cups, or 3 silicone ice-cube trays.

Add all ingredients to a high-power blender and blend until completely smooth. Divide the mixture evenly among the muffin cups or ice-cube trays until firm; pop out of the cups or trays and into Ziploc bags. Store in the freezer until ready to use.

When ready to make the ice cream, remove 1 muffin-sized disk or 4 ice cubes per serving. Chop the muffin disk into pieces. Place in the food processor and process until it resembles breadcrumbs. Press down with a rubber spatula, then continue to process just until the mixture begins to come together in a ball. Use an ice-cream scoop, as usual, to serve.

Vegan Crêpes:

1/2 C All-Purpose Flour (Preferably Organic, Unbleached)
1 tsp Coconut Sugar
1/8 tsp Salt
1/2 C + 2 Tbsp Non-dairy Milk
1 Tbsp Melted Coconut Oil
1 Tbsp Maple Syrup

Sift together flour, sugar and salt in a medium bowl. Add milk, melted coconut oil and maple syrup and whisk to a smooth batter. Refrigerate the bowl for 30mins-1hr (depending on how impatient you are).

Heat a large frying pan over medium-high heat and lightly grease with a little coconut oil. Add a few tablespoons batter to the pan and swirl to coat the bottom. Cook for 1-2 minutes and carefully flip it once it loosens from the pan’s surface (Don’t be disheartened if it doesn’t turn out, my first of a batch is almost always a failure). Cook on the other side for a further minute, or until speckled brown.

Remove to a plate covered with a piece of parchment paper and keep warm in a low-temperature oven until you’ve finished cooking.

Repeat the process with the rest of the batter. You should be able to make 4-6 crêpes, enough for 2 people.

Spread one side of the crêpes with the compote, tuck in a few slices of orange and fold over.

Serve topped with more oranges, another dollop of compote and a scoop of cinnamon ice-cream.

Serves 2 (with plenty of leftover compote and ice-cream)

Vegan Crepes with Date & Orange Compote & Cinnamon Ice-Cream

Are you just jumping in to the Virtual Vegan Potluck? You can go to the very beginning by visiting our lovely host over at Vegan Bloggers Unite.

Visit the dish before mine by clicking the button below:

go_bck-300x257 See what comes after my dish by clicking the button below:

go_forward-300x243

If you’re new to Coconut and Berries, Please sign up for email updates and join me elsewhere: I’m on Facebook, Pinterest, Instagram (@coconutandberries), Google + and Twitter!

November 16, 2013 —

Chocolate-Orange-Goji Cookies

Chocolate-Orange-Goji Cookies

Hurrah, it’s Friday!

I’m dropping in with an easy, tasty cookie recipe for you to make over the weekend.

This was inspired by The Raw Chocolate Co’s award-winning Goji & Orange Raw Chocolate. I was lucky enough to sample a whole load of their products recently and fell in love with this flavour in particular. Chocolate-orange is a classic of course, but the addition of goji berries adds a little something extra to these cookies.

Even if you’re not too sure about gojis on their own (I’m not!) they really are yummy here, trust me on this one! The Raw Chocolate Co’s Chocolate-covered Goji Berries are also pretty delicious.

Chocolate-Orange-Goji Cookies | coconutandberries.com

These Chocolate-Orange-Goji Cookies are made from all good-for-you ingredients, are gluten-free, and can be either raw or baked! They have a lovely chewy texture, rich chocolatey taste with fruity undercurrents from the orange and gojis. I know you’re going to love them!

Chocolate-Orange-Goji Cookies | coconutandberries.com

Print
Chocolate-Orange-Goji Cookies (*No-Bake or Baked):

Yield: 7-10 small cookies

Ingredients

  • 1 C Nuts (I used 1/2C Walnuts, 1/2C Almonds but most should be fine)
  • 1 Tbsp Ground flaxseed
  • 2 Tbsp Cocoa
  • Zest of 1 large orange
  • 1/4 C Brown rice flour
  • 1/4 tsp Baking soda
  • 1/8 tsp Salt
  • 2 1/2-3Tbsp Agave nectar
  • 3 Tbsp Goji berries

Instructions

  1. Preheat oven to 180C/350F. Line a baking sheet with parchment paper.
  2. Using a food processor, process nuts, ground flaxseed, cocoa, orange zest, flour, baking soda and salt until a fine meal. Careful not to over-process though. Add the agave nectar, starting off with 2 1/2 Tbsp. Process again until the mixture holds together when squeezed between your fingers. If it still looks a little dry (will depend on the variety of nuts used) add the remaining 1/2 Tbsp of agave and process again. Finally, add the goji berries and pulse two or three times to incorporate. 
  3. Roll balls of dough with your fingers (approx 1 heaping Tbsp each), flatten into a cookie shape and place on your prepared baking sheet about 2” apart.
  4. They should look like the below picture- not too wet, not too dry.
  5. Bake for 8-10 minutes until the cookies are dry on top. Allow to cool completely before removing from the baking sheet (they firm up as they cool).

Notes

*Note: For no-bake cookies, omit the baking soda and, either roll into balls and refrigerate or press into a container, refrigerate, and cut into squares.

3.1
http://www.coconutandberries.com/2013/10/25/chocolate-orange-goji-cookies/

Chocolate-Orange-Goji Cookies | coconutandberries.com

I’m submitting this recipe to the weekly link-parties, Wellness Weekends and Healthy Vegan Fridays

Chocolate-Orange-Goji Cookies | coconutandberries.com

What’s cooking in your kitchen this weekend?

My followers on instagram get sneak previews of blog recipes so if you’re not following me over there yet, please do (@coconutandberries)! Let me know who you are too so I can follow you back and if you make these cookies share your pics with the #coconutandberries so I can see them!

If you’re new to Coconut and Berries, Please sign up for email updates and join me elsewhere: I’m on Facebook, Pinterest, Instagram (@coconutandberries), Google + and Twitter!

Follow Coconut and Berries with Bloglovin or Feedly. 

October 25, 2013 —

Blueberry-Orange Buckwheat Waffles

Blueberry-Orange Buckwheat Waffles

Hello, hope everyone’s had a good weekend!

Before I get to today’s recipe, just a reminder that Coconut and Berries is now on Facebook AND Instagram. Head on over and join in the fun!

Blueberry-Orange Buckwheat Waffles

I sadly didn’t grow up eating waffles and even pancakes were limited to holidays abroad with those extravagant American-style hotel breakfast buffets I loved so much. I almost always went for pancakes with lashings of maple syrup and especially loved watching the chefs cook them in front of you . Occasionally back at home my Mum would buy a container of Betty Crocker “shake to make pancake” mix and treat me and my brothers to a special Sunday breakfast. Anyone else ever have that stuff? It’s probably filled with nasty ingredients, but we certainly loved those pancakes!

Waffles are basically pancakes in a funny shape so I knew I’d like them, so much so that I bought myself a waffle iron a few years ago despite never having tried them. But my iron has only ever been used a couple of times since these past few years I’ve been living in university accommodation (and abroad) where kitchen space is rather limited…

Uni finished, waffles are back in my life! Hurrah! These Blueberry-Orange Buckwheat Waffles are reasonably healthy too. I incorporated buckwheat flour, oats and fruit, reduced the oil with unsweetened apple purée and didn’t overly sweeten the waffles…a generous drizzle of maple syrup sorted that out instead!

They turned out perfectly- crispy on the outside and fluffy on the inside. The citrus and berries made them feel a little more summery and the buckwheat flour and oats give them a nice nutty flavour as well as making them super filling. I’ve shown two in the pictures below but it was a case of my eyes being bigger than my stomach and after one I admit I was pretty stuffed!

Blueberry-Orange Buckwheat Waffles

Naked waffles, hot and crispy.

If you don’t plan to eat all the waffles in one go, I recommend leaving them to cool on racks rather than stacking them so they stay crispy . They freeze really well too. When completely cool, wrap them up individually in foil or plastic wrap and pop them in the freezer. You can just pull one out when you fancy a special breakfast. I put them in the toaster to defrost and they get nice and crispy, just as good as fresh.

Blueberry-Orange Buckwheat Waffles

Pre maple syrup drowning…

Blueberry-Orange Buckwheat Waffles

That’s better!

I use a Cuisinart Belgian Waffle Maker  and love it! 

Print
Blueberry-Orange Buckwheat Waffles

Yield: 5 large Belgian waffles

Ingredients

  • 1 C Buckwheat flour
  • 1/2 C Plain/all-purpose flour
  • 1/2 C Rolled oats
  • 2 tsp Baking powder
  • 1/2 tsp Baking soda
  • 3/4 tsp Salt
  • 1-3/4 C Almond milk
  • 1/3 C Unsweetened apple purée (apple sauce)
  • 2 Tbsp Coconut sugar (or cane sugar)
  • 2 Tbsp Oil-
  • 2 Tbsp Ground flaxseed
  • 1 tsp Vanilla extract
  • Zest of 1 large orange
  • 1/2 to 2/3 C Frozen blueberries
  • I served mine with sliced oranges and more blueberries and topped with maple syrup but a berry sauce and non-dairy yogurt is another tasty option.

Instructions

  1. Combine buckwheat flour through to salt in a large bowl.
  2. In a medium bowl thoroughly whisk liquid ingredients, almond milk through to orange zest. Stir liquid ingredients into dry, just until combined.
  3. Leave batter to stand for 5 minutes while you preheat the waffle iron.
  4. Preheat the waffle iron for a few minutes while the batter is standing. Wipe or spray both grids of the waffle iron with oil.
  5. Ladle the batter onto the centre of the iron, making sure not to cover more than 2/3 of the iron’s surface (They will spread!). Close the iron and bake for 3-5 minutes (will vary with waffle irons- mine beeps when they’re cooked and is fairly accurate) or until the waffles can be removed easily.
  6. Remove to cooling rack and repeat until batter is all used up.

Notes

*I haven’t tried it out myself, but I imagine you could use this batter to make pancakes too if you don’t have a waffle iron. You could probably reduce or remove the oil too as it’s what gives waffles that characteristic crispy exterior and so is unnecessary for pancakes.

*To make these gluten-free sub a gluten-free all purpose flour for the 1/2 C wheat flour and use certified gluten-free oats.

*If you’re not a fan of buckwheat then try another whole grain flour: spelt, barley, wholewheat, teff etc.

3.1
http://www.coconutandberries.com/2013/07/15/blueberry-orange-buckwheat-waffles/

Do you have a waffle iron? Any favourite recipes or topping ideas to share?

If you’re new to Coconut and Berries, please sign up for email updates and join me elsewhere!  I’m onFacebook,  Pinterest, Instagram (@coconutandberries), Google + and Twitter! You can also follow Coconut and Berries with Bloglovin or Feedly.

July 15, 2013 —

  • « Previous Page
  • 1
  • 2
  • 3
  • 4
  • Next Page »
I’m Emma, a passionate vegan foodie sharing my kitchen adventures and healthy plant-based creations. Hope you stick around!

Follow on Bloglovin

Make sure you never miss a recipe. Subscribe here!

Enter your email address to subscribe to this blog and receive notifications of new posts by email.

Tasty Food Photography eBook.
Froothie Optimum 9400
Vibrant Life Cleanse Program & Cookbook

Tags

Almond Milk Almonds Appetizer Avocado Baked Banana Basil breakfast Carrots Cashews Chickpeas Chocolate Cinnamon Coconut Coconut Milk Coconut Oil Coriander Courgette Dates Dessert Ginger Gluten-free Kale Lemon Lentils Lunch Main Dish Mint Oats orange Parsley Quinoa Raw Red Pepper Review Salad Salad Dressing Side-dish Smoothie Snack Tofu Tomatoes Vegan Vegan MoFo Walnuts

Follow Coconut and Berries on Instagram

Vegan Woman Top Vegan Blogs to Watch 2014 Winner

Latest Recipes

  • Update + Coconut and Berries in 2016
  • Courgetti Salad with Cherry Tomatoes, Grilled Corn & Herby Dressing
  • A Vegan Dinner Party with La Belle Assiette
  • Plant-Powered Families: Review & Double Chocolate Orange Banana Muffins
  • Red Lentil, Spinach & Potato Curry with Baobab [& a Giveaway!]

Popular Recipes Lately

Sweet & Smoky Tempeh Fajitas (with Black Bean-Lime Dip)
Vegan Asparagus & Fennel Quiche (with a Quinoa Crust)
Polenta-Olive Tapenade Bites
Macro Bowl with Carrot-Ginger-Almond Sauce
Jerk Tofu & Pineapple Skewers
Optimum 600 Juicer - Froothie
Ad
  • About
  • Contact
  • Inspiration
  • Recipes
  • All Recipes
  • Reviews
Copyright © 2013 Emma Potts and Coconut and Berries . Unauthorized use and/or duplication of this material without express and written permission from this blog’s author is strictly prohibited. Excerpts and links may be used, provided that full and clear credit is given to with appropriate and specific direction to the original content.
Coconut and Berries is a participant in the Amazon Services Associates Program, an affiliate advertising program designed to provide a means for sites to earn advertising fees by advertising and linking to Amazon.com.

Copyright © 2017 · Coconut and Berries · Designed By Beautiful Dawn Designs