Review: Ombar Raw Chocolate

Ombar Raw Chocolate

If you know me in real life, you’ll know that I’m a chocolate fiend. Chocolate to me is how coffee is to many people. A daily necessity. Religiously I have a little piece of dark chocolate after lunch,  and I need that cacao boost to the extent that I’ll carry a bar of the dark stuff with me when travelling, for fear I won’t be able to get my fix!

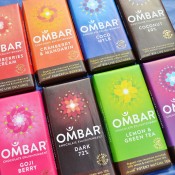
I’ve talked about the Nutribox on here before, and my first taste of Ombar Raw chocolate was via my monthly snack box. It was love at first taste and since I’ve been trialing a new option with the Nutribox to have more say in which products you receive, I’ve been requesting Ombars! I’d only tried the Coconut 60% and the Cranberry & Mandarin so jumped at the opportunity to try the whole range of flavours.

Ombar Raw Chocolate review

Before I tell you what I thought of the individual flavours I thought I’d talk a little about raw chocolate for those of you unfamiliar with it. You might be wondering “What’s the difference between raw chocolate and ‘normal’ chocolate?” or “What’s better about raw chocolate?”

Well, there are 2 main aspects: the first is low temperature. To make standard chocolate the ingredients are heated to high temperatures, 2, 3 or more times in the bean to bar process, destroying nutrients. Raw chocolate, on the other hand, is made from unroasted cacao beans and any heating that takes place is done at low temperatures preserving the flavanols responsible for its antioxidant properties. The 2nd aspect is that there’s no added junk. Raw chocolate doesn’t contain any of the junk generally added to conventional chocolate- no dairy, refined sugars, added fats or fillers.

Ombar Raw Chocolate review

Ombar raw chocolate bars only use high quality ingredients: raw cacao, coconut sugar, fruit and bio live cultures (probiotics!), all of which are organic and sustainably sourced. You’ve probably heard about the darker side of chocolate production, with workers on huge plantations around the world being poorly treated and receiving far below acceptable wages, but Ombar explicitly state that they work with independent farmers and pay them a significant premium over market price to ensure that they are fairly compensated for their hard work. This does mean that Ombar raw chocolate is a bit more expensive than the chocolate you might be used to buying, but, in my opinion, it’s worth it!

Ombar Raw Chocolate review

Coconut 60% – This bar was what first got me excited about Ombar. It’s very creamy and has a really smooth texture due to the coconut cream in the ingredients. The coconut flavour is quite pronounced, which I love, but it isn’t overpowering.

Açai & Blueberry – This one is darker in colour with a fruity fragrance. The fruit flavour didn’t come through as much as I would have liked though.

Dark 72% -  I’m typically a fan of dark, dark chocolate, 90% being my favourite, so that might be affecting my judgment on this one. It just wasn’t chocolatey enough for a plain bar for my tastes. You could tell it had a higher cacao percentage than the others though, with its darker colour and firmer texture.

Strawberries & Cream – YUM! I really loved this one. Like the coconut bar it has coconut cream in the mix so it has the same super smooth, melt-in-the-mouth texture. The strawberry flavour is pleasant too. Perfect for this “Coconut and Berries” girl Smile

Coco Mylk – If I thought the previous bars I tried were creamy, this one was even more so. It’s very reminiscent of milk chocolate from what I can remember- sweet and milky. I’m sure if you’re a milk chocolate fan but are avoiding dairy then you’ll love this one. it was just a little too sweet for me.

Cranberry & Mandarin – This was another of my favourites. It has a darker chocolate base (no coconut cream) and a lovely zinginess from the fruit which balances out the sweetness nicely. The cranberry and mandarin is a great flavour pairing too.

Green Tea & Lemon – I liked this one, but didn’t love it. It’s a unique taste certainly and I was surprised that the lemon complemented the chocolate so well. I couldn’t really taste the green tea in this chocolate, but it is rich in antioxidants so at least I was getting a health boost!

Goji Berry – I was surprised that this was another one of my top picks. Goji berries are not something I eat by the handful, although I do like them occasionally mixed with other fruits and nuts in trail mix. Unlike the açai berry & blueberry bar this one had whole pieces of berry in, as well as fruit powder, which added a nice texture and infused the whole bar with fruity fragrance.


I’m really impressed with Ombar raw chocolate. I’ve tried a few other raw chocolate brands and none of them have compared. The texture has either been a little grainy, or they’ve been too “buttery” with not enough chocolatey flavour for me. I’m really pleased to see that Ombars are certified Vegan too. This is chocolate you can feel good about eating!

Ombar raw chocolate is available in various independent health food stores and larger stores such as Wholefoods, as well as online retailers including The Raw Chocolate Company and Planet Organic. (EUROPE only at the moment)

Have you tried Ombar or other raw chocolate before? What did you think? 

Note: These products were sent to me for review purposes, but the opinions expressed are my own.

Summer Rolls (+ Sprouting)

Summer Rolls

(If you follow me on Instagram (@coconutandberries) or on Facebook, you might have had a little sneak preview of these beauties. If not, let’s connect! )

I associate “spring rolls” with the appetizer you find in Chinese restaurants. A greasy, fried pastry of sorts with some indistinguishable vegetable filling. Not something I want to be eating anyway. I know the uncooked, cold rolls are sometimes called “spring rolls” too, but I’m sticking with “summer rolls” for mine so they have none of those connotations.  Besides, they’re so colourful that they’re perfectly summery!

Summer Rolls (Packed with good stuff) + Sprouting

I’m a huge fan of beans and legumes and another way to enjoy them is sprouted! You can sprout almost any seed, legume or grain and eat them raw. They’re incredibly healthy- packed with fibre, protein, vitamins, minerals and beneficial enzymes, not to mention they taste delicious. You might be a little intimidated by the process but I promise it’s so easy and you don’t need any fancy equipment. Here’s a great guide, including a video.

It’s pretty fun watching the little tails grow and the sprouts come alive! If you don’t have a garden or are too impatient to grow vegetables, sprouting is perfect for you, as within a couple of days your sprouts will be ready to eat.

You can eat them any way you like- add them to salads, make raw hummus from sprouted chickpeas. Sprouted grains like buckwheat and quinoa are delicious for breakfast too, eaten like cereal with non-dairy milk and fruit.

Lentil Sprouts (Sprouting)

I opted for lentil sprouts this time as I had a nearly-finished bag of green lentils I wanted to use up. They added the perfect crunch and boost of nutrients to my summer rolls.

Fruit, Veggies + Sprouts for Summer Rolls

Mise-en-place is important when making your rolls. It makes life much easier if all your ingredients are ready before you get going. Let your imagination be your guide with your choice of fillings. Fresh herbs are not optional in my opinion though as they really bring these to life. As you can see from the picture below, I changed my mind at the last minute and added some sliced avocado for a nice texture contrast.

Summer Rolls (Packed with good stuff) + Sprouting

The Best Summer Rolls:

3/4C Shredded carrot
3/4 Shredded beetroot
1/4C Fresh coriander (leaves only)
1/2C Lentil sprouts
1/2 Medium mango, thinly sliced
1/2 Small avocado
Sriracha
Lime
Rice Paper Wrappers (I got mine from a local Asian store but you should be able to find them in health-food stores and supermarkets too)

Peanut-Ginger Sauce

This is a variation on the sauce I used for my 10-minute Raw Peanut Noodles, but a mini batch, just enough for these rolls.

1T Peanut Butter
1T Non-dairy milk
1/2t Tamari
1/2t Lemon/lime juice
1/2t Agave nectar
1/2t Grated fresh ginger
Dash of cayenne

As mentioned, have all your filling ingredients chopped and prepped.

Fill a large shallow dish with warm water (bath temperature). Dip one rice paper wrapper in the water and leave a few seconds to soften it. Rice paper rolls vary hugely in size and thickness but don’t leave it in there too long. It should still be slightly firm because when you lay it out it will continue to absorb the water on its surface. Lay wrapper carefully on a flat surface, being careful not to get it stuck to itself (It might take a couple of tries before you get the hang of it- they are very delicate).

Layer your fillings down the centre of the rice paper circle, make sure you’ve got a bit of everything in there. Add a little sriracha and a squeeze of lime if you like. Fold the ends over the filling and then tightly roll the sides around to create a parcel.

Repeat until all your fillings are used up.

Whisk together ingredients for sauce and serve alongside rolls for dipping.

(Makes 4 large Rolls/Serves 1)

It’s like a salad in held-held form! These make a great packed lunch as they travel well but don’t keep them in the fridge for more than a few hours as the wrappers tend to harden up.

Summer Rolls (Packed with good stuff) + Sprouting

Have you tried sprouting or making spring/summer rolls before?

What are your favourite sprouts?

10-Minute (Nearly) Raw Peanut Noodles

10-Minute Raw Peanut Noodles

10-minute Raw Peanut Noodles

I’ve been a raw food fan for a while now. I love the taste of fresh fruit and vegetables, nuts + seeds in their natural state and especially love how a raw meal makes me feel- nourished and energized! I’ve done a week eating all raw before and even celebrated my 21st birthday at Saf, a fantastic raw restaurant in London.

Despite how much it now, when I first came across raw cuisine I was a little intimidated by all the gourmet recipes I came across that took days to prepare and lots of expensive superfoods I’d never heard of before. But I soon came to realize that raw food doesn’t have to be time-consuming or complicated to taste good, and in fact sometimes the simplest dishes are the best. I’ve got a few raw recipes on the blog so far, a couple of salads, a smoothie and desserts and wanted to post a super quick everyday recipe that I make variations on frequently.

I have a spiralizer (the Benriner, pictured) that I use to make raw veggie noodles, but a julienne peeler works just as well, or you can even make thick “pappardelle” type noodles with a regular vegetable peeler. Courgette noodles are the classic but I wanted an extra colourful dish this time so I made carrot noodles too and added thinly sliced red pepper and lots of fresh herbs.  Edamame and cashews turned this into a more substantial meal, and finally I coated everything with a slightly spicy peanut sauce, so good I couldn’t resist licking my plate after finishing!

10-minute Raw Peanut Noodles

10-Minute (Nearly) Raw Peanut Noodles

Yield: 1 Serving

Ingredients

  • 10-Minute (Nearly) Raw Peanut Noodles:
  • 1 Medium courgette, spiralized
  • 2 Small carrots, spiralized
  • 1/2 Red pepper, sliced thinly
  • 1/3 C Edamame, cooked and cooled
  • 2 Tbsp Fresh basil, julienned
  • 2 Tbsp Fresh coriander, roughly chopped
  • 2 Tbsp Toasted Cashews (I actually used some Tamari-roasted Cashews from Clearspring that I had on hand)
  • For the Spicy Peanut Sauce:
  • 1 Tbsp Peanut butter
  • 1 Tbsp Lime juice
  • 1/2 Tbsp Agave
  • 1/2 tsp Toasted sesame oil
  • 1 Small clove garlic, minced (optional)
  • 1/2 tsp Tamari
  • A little water to thin (to make as runny as you like it- though bear in mind the vegetables will release water when coated in the sauce so don’t make it too thin!)

Instructions

  1. Prepare dressing first: Simply stir all ingredients in a jar or bowl together until completely smooth and add a little water, a teaspoon at a time, if necessary, until it reaches your desired consistency. Set aside.
  2. Spiralize your vegetables and chop your herbs. Mix all the ingredients, except the sauce, in a large bowl, you might want to cut some of the noodles if they’re particularly long to make them a little easier to eat (!). Finally drizzle over your sauce and toss to coat everything.

Notes

*Most store-bought peanut butter uses roasted not raw peanuts, so if you’re concerned about the “raw” status of this dish try almond butter instead. The edamame are also cooked so omit for raw and add more nuts instead.

http://www.coconutandberries.com/2013/07/31/10-minute-raw-peanut-noodles/

10-minute Raw Peanut Noodles

I’m submitting this recipe for “10-Minute (Nearly) Raw Peanut Noodles” to the weekly blog hop Raw Foods Thursdays

10-minute Raw Peanut Noodles

Are you a raw food fan? What are your favourite simple and speedy raw recipes?

Chocolate-Coated Peanut Butter Banana Pops

Chocolate Coated Peanut Butter Banana Pops


Chocolate-Coated Peanut Butter Banana Pops

Even if I haven’t made ice cream in my ice-cream maker yet this summer, that doesn’t mean I haven’t been enjoying frozen treats. The heat-wave that’s hit England the last few weeks seems finally set to break but that definitely won’t stop me continuing to enjoy these delicious banana pops.

I’ve long been freezing bananas with sticks in and eating them as simple frozen pops (or lollies as we usually call them here), but seeing people around and about with decadent chocolate-coated ice creams put me in the mood for something a little more naughty! As these are homemade you can avoid all those nasty added ingredients in store-bought ice cream and feel rather more virtuous about eating them. You could even make these raw using raw almond butter for the filling and making your own raw chocolate with cacao, agave and coconut oil.  Date caramel would also be a great filling if you’re not a big nut butter fan ( although just writing that sounds crazy to me!).

Frozen Peanut Butter Banana Pops

These involve a couple of stages but are super simple to make, and the result is so worth it.

Chocolate-Coated Peanut Butter Banana Pops
Serves 4
Write a review
Print
Ingredients
  1. 2 Ripe bananas
  2. 1/4 C Salted peanut butter (or other nut butter)
  3. Optional extras: 1/2 tsp cinnamon, 1/2 tsp vanilla, 1 Tbsp raisins- I added all of these and loved the little chewy raisins and sweet cinnamon flavour)
  4. 2/3 C Dark chocolate chips
  5. 1 Tbsp Coconut oil
  6. 4 Ice lolly sticks or wooden skewers
Instructions
  1. Slice Bananas in half across the middle to get 4 pieces then slice each of the 4 pieces in half lengthwise to get 8 pieces.
  2. If using extras mix them into your peanut butter now. Spread 1/4 of the peanut butter onto the flat side of 4 of the pieces, place the skewer on top and sandwich together with another half banana.  See picture above. Place on a parchment-lined baking tray and freeze until solid.
  3. When ready, melt chocolate chips in a bowl over a bowl of hot water or bain marie and stir in melted coconut oil. The coconut oil makes the chocolate runnier and easier to spread.
  4. Take the bananas out of the freezer at the last minute and spread each one with chocolate. I used a mini spatula to spread it evenly. The chocolate will firm up immediately on the frozen banana so move quickly! When bananas are completely coated place back on the tray and freeze for a short while.
  5. Store wrapped individually in parchment paper or in a sealed container in the freezer.
Coconut and Berries http://www.coconutandberries.com/
I’m submitting this recipe to  the weekly blog hops Raw Foods Thursdays and Healthy Vegan Fridays

Chocolate-Coated Peanut Butter Banana Pops

I’m a huge fan of the peanut butter and banana combination and the thick layer of salted peanut butter and crunchy chocolate coating made for a fabulous summer dessert, especially enjoyed sitting on the grass in the garden.

I’d love to make some fruity lollies but I don’t have a mould unfortunately. Any ideas for making them without?

Mini Raw Cacao, Coconut + Raspberry Cupcakes

Mini Raw Cacao, Coconut & Raspberry Cupcakes

I hate wasting food. I’d love to say that my concern for the environment is what compels me to do my best not to waste, but in reality it’s probably mainly because I love food and hate the thought of throwing anything away! I’m also pretty tight-fisted and wasting food = wasting money.  I try to follow all the rules: I plan my meals weekly, make sure to store my produce correctly, keep my cupboards and freezer well-stocked with staples to make the most of leftovers, and don’t buy more than I can eat (most of the time at least… I’m pretty easily tempted by fruit and vegetables! all the more so when shopping at farmers’ markets)

I mentioned I’ve started making my own almond milk at home.  I was initially reluctant to try it given that nuts are so darn expensive, as well as thinking the process was somewhat wasteful since you’re left with quite a bit of nut pulp after squeezing out all the goodness from the whole nuts. Going through with it and doing a little calculation proved me wrong though- in fact, if you buy your nuts in bulk, as I do, you can make your own almond milk for less money than the bought stuff, and the nut pulp needn’t be wasted but is a bonus that you can use in other kitchen creations. I love how much tastier it is and that it contains no added anything…Oh, and there’s none of the packaging either! A winner all round.

A bit of scouting about online for how to use this precious pulp unearthed all sorts of exciting recipes: From raw nut pulp hummus and vanilla almond cookies to sweet + savoury crackers and these beautiful little cupcakes, the recipe I decided to start off with.

Mini Raw Cacao Coconut Raspberry Cupcakes

There are hundreds of recipes for raw nut + date balls out there and I’m definitely a fan of them, but these are a little different, the texture is much “cakier” and they’re not so intensely sweet. The mild chocolatey coconut base pairs well with the zingy raspberry topping and prevents them from being cloying at all.

Mini Raw Cacao Coconut Raspberry Cupcakes

I changed up the recipe just a little bit to suit the quantities of nut pulp I had, as well as boosting the chocolate flavour and zipping up the topping a touch.

Mini Raw Cacao, Coconut + Raspberry Cupcakes

(Minimally adapted from Sweetly Raw)

For the Cake Base:

3/4C Almond pulp (Leftover from making almond milk- it should be dry and crumbly)
1 C Walnuts
1/4 C Raw cacao powder OR Cocoa powder (if not concerned for raw status)
Pinch salt
1 Recipe date paste (see below)
1/2 t vanilla
2T Melted coconut oil

Pulse walnuts and almond pulp together in a food processor until you get a coarse meal. Be careful not to over-process as it will turn to nut butter!)

Add salt, cacao powder, date paste and vanilla and process to form a thick dough.

Finally drizzle in the coconut oil and pulse briefly. Scrape out mixture into a bowl, cover and refrigerate for 30 minutes or longer to firm up before shaping.

Roll the mixture into little balls with your fingers and place into petits-fours cases or mini muffin cups.

Pop the cakes back into the fridge until ready for the topping.

For the Date Paste:

1/3C Pitted, chopped, packed dates
2T Warm water
2T Agave nectar

Soak dates in warm water for 15 minutes to soften them up.

In food processor or short cup blender combine dates and water with agave nectar and blend until smooth. Stop and scrape down sides a couple of times so everything is incorporated. Set aside.

Mini Raw Cacao Coconut Raspberry Cupcakes

I’m not a fan of traditional cake frostings with vegan butter and powdered sugar-they’re always too sickly sweet for me. This cashew and coconut oil based frosting, on the other hand, is wonderful. It’s much healthier, though still very rich, and doesn’t leave you with a stomach ache.

For the Raspberry Topping:

1/2 C Raspberries ( I used defrosted frozen berries)
1/4C Cashews, soaked for a couple of hours, rinsed and drained
1T Agave nectar
1T Water
1 1/2 T Lemon juice
2 T Melted coconut oil

Blend all ingredients, except for coconut oil, in a high-powered blender until smooth. Add coconut oil and blend again for 1 minute.

Pour topping into a bowl and leave to thicken up in the fridge for at least 2 hours, especially if you want to pipe it onto the cupcakes.

Pipe or spread onto cupcakes. Move quickly as in warm temperatures it melts quite fast! Top with fresh raspberries if so desired.

Store in a sealed container in the fridge or freezer.

Makes 18-20 mini cupcakes

I’m submitting this recipe to the weekly blog party Raw Foods Thursdays

What are you making with your leftover nut pulp?

Do you have any tips for minimising food waste?