Spanish Romesco/Pesto Pizza with Grilled Vegetables

Spanish Romesco Pizza with Grilled Vegetables

Vegan Spanish Romesco/Pesto Pizza with Grilled Vegetables

I promised to share more recipes using pesto after my Pesto-Ricotta Tofu Omelettes post so here I am with another. Hopefully by now you’ve got a nice batch of pesto in the fridge, but if not, or (heaven forbid!) you’re not a fan of the green stuff, I’ve also got a delicious alternative for you today.

Cheese-less pizza to the uninitiated might sound boring, but it leaves room for so much more creativity, since you haven’t got all that cheese smothering any other flavours you add. And after all, the original Italian pizza  “pizza marinara”, is cheese-less- just a good thin crust topped with a rich tomato sauce, spiked with garlic and oregano (Fun fact: the name “marinara” doesn’t, as one might think, refer to fish or seafood, but “marinai” or sailors for whom it was first baked in the C18).

Vegan Spanish Romesco Pizza with Grilled Vegetables

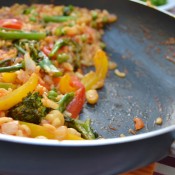
Here I’m mixing up cultures a little as Romesco is Spanish not Italian. I first came across it with the delicious “Chickpea Romesco” from Veganomicon: A tasty bean dish in a tangy roasted red pepper, tomato and paprika sauce thickened with ground almonds.

Then, when living in Barcelona I encountered this tasty sauce again. Every year when the calçots, a vegetable similar in taste and appearance to green onions or leeks, are in season, the Catalans hold the Calçotada. This festival which celebrates the harvest of the vegetable with a feast of char-grilled calçots which are then dipped in Romesco sauce before eating.

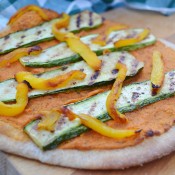
I haven’t yet tried to recreate a Calçotada back in England (!) but I wanted to enjoy that delicious sauce again in a different way. It made a great topping for pizza, rich and flavourful, especially with some grilled vegetables on top, as the slightly smoky flavour reminded me of those blackened calçots in Spain.

Vegan Pesto Pizza with Grilled Vegetables

It’s not difficult to make, but the flavour is so complex it tastes like you must have put in a lot more effort than is actually needed.

Spanish Romesco Sauce:

1 Medium red pepper (Or use the equivalent amount from a jar of roasted red peppers)
1 Large clove garlic, chopped
2/3 C Slivered almonds
2 Tbp Red wine vinegar/Sherry vinegar
1 Tbsp Extra-virgin olive oil
1/2 Tbsp Sweet paprika
1/2 tsp Salt
Black pepper
2 Tbsp Chopped parsley

Preheat the oven to 200C/400F and place the red pepper on a baking sheet. Cook the red pepper for 25-30 minutes until skin is blackened and blistered and the pepper has collapsed. Remove from the oven and immediately place in a heat-proof bowl and cover with a plate or cling film. Leave to sit for 10 minutes. The steam helps you remove the skin.

Spread out the almonds on the same baking sheet and toast for a few minutes in the oven until golden. Be careful as they burn easily.

When the pepper is cool enough to handle, rub of skin with your fingers, deseed and dice into 1” pieces.

In a food processor or high-power blender combine the chopped red pepper, toasted almonds, garlic, vinegar, oil, paprika and seasoning. Process to a thick, smooth consistency. You may need to scrape down the sides of the bowl or blender jug a few times to get everything incorporated. Taste for seasoning and pulse in the parsley.

You won’t need all this for the pizza so why not try the leftovers with some grilled vegetables, Calçotada-style! It’s also yummy as a dip for carrot sticks or spread onto wholewheat pitta for a quickie lunch.

For the pizzas:

1 Ball wholegrain pizza dough (I use the pizza dough recipe from Vegan With a Vengeance, available online here, using half wholegrain flour. To make 2 small pizzas, as pictured, I halved the recipe. )
1/4C Pesto
1/4C Romesco Sauce (See above)
Grilled/Fresh Vegetables ( I grillled some courgettes, roasted a second pepper, and added some slices of fresh tomato)

Preheat oven to 250C/500F (preheat your pizza stone if you’re lucky enough to have one). Divide dough into two and roll out thin to two round (ish!) pizza bases. Spread each with the pesto and romesco sauce respectively, scatter on vegetables of choice. Slide onto a baking tray and cook for approx 10 minutes or until the crust is brown and crispy.

Serve hot, alongside a big green salad.

Serves 3

What are your favourite pizza toppings?

Vegan Spanish Romesco Pizza with Grilled VegetablesVegan Pesto Pizza with Grilled Vegetables


10-Minute (Nearly) Raw Peanut Noodles

10-Minute Raw Peanut Noodles

10-minute Raw Peanut Noodles

I’ve been a raw food fan for a while now. I love the taste of fresh fruit and vegetables, nuts + seeds in their natural state and especially love how a raw meal makes me feel- nourished and energized! I’ve done a week eating all raw before and even celebrated my 21st birthday at Saf, a fantastic raw restaurant in London.

Despite how much it now, when I first came across raw cuisine I was a little intimidated by all the gourmet recipes I came across that took days to prepare and lots of expensive superfoods I’d never heard of before. But I soon came to realize that raw food doesn’t have to be time-consuming or complicated to taste good, and in fact sometimes the simplest dishes are the best. I’ve got a few raw recipes on the blog so far, a couple of salads, a smoothie and desserts and wanted to post a super quick everyday recipe that I make variations on frequently.

I have a spiralizer (the Benriner, pictured) that I use to make raw veggie noodles, but a julienne peeler works just as well, or you can even make thick “pappardelle” type noodles with a regular vegetable peeler. Courgette noodles are the classic but I wanted an extra colourful dish this time so I made carrot noodles too and added thinly sliced red pepper and lots of fresh herbs.  Edamame and cashews turned this into a more substantial meal, and finally I coated everything with a slightly spicy peanut sauce, so good I couldn’t resist licking my plate after finishing!

10-minute Raw Peanut Noodles

10-Minute (Nearly) Raw Peanut Noodles

Yield: 1 Serving

Ingredients

  • 10-Minute (Nearly) Raw Peanut Noodles:
  • 1 Medium courgette, spiralized
  • 2 Small carrots, spiralized
  • 1/2 Red pepper, sliced thinly
  • 1/3 C Edamame, cooked and cooled
  • 2 Tbsp Fresh basil, julienned
  • 2 Tbsp Fresh coriander, roughly chopped
  • 2 Tbsp Toasted Cashews (I actually used some Tamari-roasted Cashews from Clearspring that I had on hand)
  • For the Spicy Peanut Sauce:
  • 1 Tbsp Peanut butter
  • 1 Tbsp Lime juice
  • 1/2 Tbsp Agave
  • 1/2 tsp Toasted sesame oil
  • 1 Small clove garlic, minced (optional)
  • 1/2 tsp Tamari
  • A little water to thin (to make as runny as you like it- though bear in mind the vegetables will release water when coated in the sauce so don’t make it too thin!)

Instructions

  1. Prepare dressing first: Simply stir all ingredients in a jar or bowl together until completely smooth and add a little water, a teaspoon at a time, if necessary, until it reaches your desired consistency. Set aside.
  2. Spiralize your vegetables and chop your herbs. Mix all the ingredients, except the sauce, in a large bowl, you might want to cut some of the noodles if they’re particularly long to make them a little easier to eat (!). Finally drizzle over your sauce and toss to coat everything.

Notes

*Most store-bought peanut butter uses roasted not raw peanuts, so if you’re concerned about the “raw” status of this dish try almond butter instead. The edamame are also cooked so omit for raw and add more nuts instead.

http://www.coconutandberries.com/2013/07/31/10-minute-raw-peanut-noodles/

10-minute Raw Peanut Noodles

I’m submitting this recipe for “10-Minute (Nearly) Raw Peanut Noodles” to the weekly blog hop Raw Foods Thursdays

10-minute Raw Peanut Noodles

Are you a raw food fan? What are your favourite simple and speedy raw recipes?

Summer Vegetable Paella

Summer Vegetable Paella

A month ago I went on holiday with a group of 8 university friends. It was pretty much a week devoted to rest and relaxation after the hard slog leading up to finals. We did little other than lounge in the villa garden, play in the pool and eat and drink! We definitely got into a Spanish routine, definitely a change from my usual “early to be early to rise”. Meals were pushed back, with lunch usually around 4 or 5pm and dinner at 10 or 11. Even if we didn’t do anything terribly touristy we did make sure to enjoy some real Spanish food. Sangria and gazpacho were everyday occurrences and we went out for tapas a couple of evenings. My favourite meal out was at a little tucked away place which we happily stumbled across and where we had the most delicious vegetable paella.

Summer Vegetable Paella

I’d forgotten about that meal recently until I found a bag of Arborio rice in the kitchen cupboard. Not wanting to make risotto I wondered if it could be used for paella. Calasparra rice is traditionally used for paella and Arborio for risotto but they are both similarly short grain. Apparently the difference is that paella rice doesn’t create a creamy sauce and rather sticks together. The constant stirring of risotto is what helps the rice release its starch and go creamy so if you just leave it to do its own thing it ends up more like paella and it ends up with that nice crusty bottom and edges.

Summer Vegetable Paella

As usual, I went pretty heavy on the vegetables but you could add as many as and any type you like. The chickpeas are also not typical but I felt like this meal could do with a protein boost, and they add some textural variation too. Tomatoes, sweet paprika and saffron (and a little white wine if you like…) bring everything together.

Summer Vegetable Paella

Large pinch saffron threads (approx 1/4t)
1T Olive Oil
1 Small onion, diced
2 Cloves garlic, minced
1/2 Red pepper, 1/2 Yellow pepper, cut into thin strips
1/2T Tomato paste
1/2t Sweet paprika
1 Cup Short-grain rice (Calasparra recommended but I used Arborio. Short grain brown might also work but liquid quantities and cooking times may vary)
1/2 400g/14oz Can chopped tomatoes
500m/2C Vegetable broth + 1/2C White wine (or more broth)
3/4C Chickpeas
125g/4oz Tenderstem broccoli/Green beans, chopped into short lengths.
1/2C Fresh or Frozen and thawed Peas

Crush the saffron with your fingers into a small bowl and cover with a couple of tablespoons warm water to release its flavour. Set aside.

Heat the oil in a large pan over medium heat. Add the onion and cook, stirring until the onion is soft, about 5 minutes. Add the peppers and garlic and a good pinch of salt and continue cooking, stirring for another 3 minutes and the peppers are also softening. Add the tomato paste, paprika and rice and stir for a minute until everything is coated in spice and the rice grains begin to crackle. Add the tomatoes and cook until they cook down a little, another 5 minutes. Stir in the saffron and its soaking water and season well with salt and pepper.

Add the vegetable broth, wine,  chickpeas and broccoli or green beans. Bring to the boil and stir once. Reduce the temperature to low and allow to simmer, without stirring, until most of the liquid has evaporated, approx 10-15 minutes. Add the peas and continue cooking until the top of the paella looks dry, another 5-10 minutes. Leave to sit for 5 minutes before serving.

Serves 3-4

What dishes have you brought back from holiday with you? I often make notes on meals and foods I’ve enjoyed when I’m away so I can do some recreating in my own kitchen!

Cauliflower Fried “Rice” with Grilled Asian Tofu

Cauliflower Fried Rice with Asian Grilled Tofu

There are so many food ideas I want to try that inevitably it takes me longer to get to certain things than others. Case in point: Cauliflower “rice” arrived on the scene, at least on my radar, several months ago. It got added to the queue and was only finally made by me a week or so ago. I’ve said this before but if only there were more meals in the day (and time to make them…) so I could get to making all the creative recipes out there , as well as my own recipe ideas, faster!

Cauliflower Rice with Grilled Asian Tofu | coconutandberries.com

Before anyone thinks I’m going on some carb-eliminating diet or something, I better just stop and say that I’m in no way cutting grains from my diet. Rice features in a good many of my meals and I have no problem with it at all- Make mine brown basmati though please Smile.  Sometimes, however, I’m simply in the mood for a more vegetable-centric meal.

Stir-fried veggies

To the cauiflower “rice” base I added plenty of other vegetables, including edamame, a favourite of mine, and also a great source of protein, so even without the grilled tofu on top you’ve got a fairly substantial dish. Simply seasoned with lots of ginger and garlic and a couple of splashes of tamari it’s a snap to put together too.

Cauliflower Fried Rice


Cauliflower Fried “Rice” with Grilled Asian Tofu

Yield: 2-3 Servings

Ingredients

    For the Tofu (Optional):
  • (From Veganomicon)
  • 1/2 400g/8oz Block Tofu, Drained, Pressed and cut into thin slices (I got 4 rectangles)
  • 1/4 C Mirin
  • 1-1/2Tbsp Tamari
  • 1 Tbsp Brown rice vinegar
  • 1/2 Tbsp Sesame oil
  • 1/2 tsp Sriracha chili sauce
  • 1/2” Pc fresh ginger, chopped into large chunks (for flavouring the marinade)
  • 1 Clove garlic, smashed (for flavouring the marinade)
  • For the Cauliflower Rice
  • 1 Small head cauliflower
  • 1 Tbsp Coconut oil
  • 2 Lg cloves garlic
  • 1 Tbsp Minced fresh ginger
  • 1 Red pepper, diced
  • 3/4 C Frozen edamame
  • 1/2 C Corn
  • 2 Tbsp Tamari
  • 3 Spring/Green Onions, thinly sliced
  • Fresh coriander, for garnish

Instructions

  1. Mix all listed ingredients for the tofu, except tofu itself, in a large, shallow dish. Lay slices of tofu in the marinade and leave for 30 minutes, flipping tofu halfway through.
  2. While marinating prepare the vegetables. Using a food processor, pulse cauliflower florets until you get a rice-like texture, or alternatively chop finely. I got 4 cups of rice. Set aside.
  3. On a hot grill pan, lightly brushed with oil, grill tofu for 3 minutes on 1 side, then flip and cook for a further 2 minutes. Using tongs gently press tofu into the grill ridges, to get nice dark lines. Move to a chopping board and cut each piece diagonally into 2 triangles.
  4. While tofu is cooking,  heat oil in a wok or large pan until very hot,  toss in ginger and garlic and cook, stirring, for a couple of minutes.
  5. Add red pepper and edamame and continue to cook for a further 2 minutes until pepper is beginning to soften, then add corn and cauliflower and mix together well.
  6. After another 2 minutes, drizzle the tamari over and stir through the spring onion (reserving a small amount for garnish). Continue to cook for another minute until everything is heated through. Sprinkle over reserved spring onions and fresh coriander.
  7. Spoon onto individual plates or bowls and top with a few triangles of the grilled tofu.
http://www.coconutandberries.com/2013/07/13/cauliflower-fried-rice-with-grilled-asian-tofu/

Cauliflower Rice with Grilled Asian Tofu

There have been lots of internet food trends which haven’t been hits in my kitchen but I’ll definitely do the cauliflower rice thing again.

Are there any food trends which have stuck with you?

If you’re new to Coconut and Berries, please sign up for email updates and join me elsewhere!  I’m on Facebook,  Pinterest,Instagram (@coconutandberries), Google + and Twitter! You can also follow Coconut and Berries with Bloglovin or Feedly.

Wheat Berry Salad with Chickpeas + Za’atar, Tahini Beetroot

Wheatberry Salad with Chickpeas + Za'atar

I’ve already talked about my love for Middle-Eastern flavours on the blog and I’m featuring them again today in another couple of recipes.

Dried pulses, fresh produce, herbs and spices, olive oil, lemon, garlic and grains are all characteristic ingredients in dishes from that part of the world. You can probably see why I’m drawn to them, given how naturally vegan-friendly they are, not to mention packed with flavour.

Za’atar is a herb and spice blend widely-used in the Middle-East.  Its specifics vary according to region but it usually includes toasted sesame seeds, dried thyme and sumac. It’s used as a seasoning for grilled vegetables, salads, sprinkled on top of hummus and mixed with olive oil and spread on flatbread, known as manakeesh.

I brought a bag of freshly ground sumac home  from the Grand Bazaar in Istanbul last year and am always on the lookout for new ways to use this tangy, lemony spice. So far I’ve especially enjoyed it rubbed onto roasted potatoes, a light sprinkle on fattoush (cucumber, tomato, herb + pita salad), and now in this spice blend.

Wheat Berry Salad with Chickpeas + Za’atar

I love all the different textures in this salad, with the chewy wheat berries, tender chickpeas, melt-in-the-mouth roast aubergine and juicy fresh tomatoes. The combination made it satisfying enough for a supper salad, alongside my delicious tahini beetroot.Grain and bean salads hold up well for a while in the fridge too so this salad would be perfect to keep on hand for quick lunches throughout the week.

Wheat Berry Salad with Chickpeas + Za’atar

Adapted from Green Kitchen Stories

1 1/2C Cooked chickpeas/ 1 Can chickpeas
1/2C Wheatberries OR Farro OR Spelt berries
1 Large aubergine, diced into 1” chunks
1 T Olive oil, 1/2 t cumin seeds, 1/2 t sumac
1 C Cherry tomatoes, halved
2T Lemon juice
1T Olive oil
Salt + Pepper
Large handful of fresh flat-leaf parsley, roughly chopped
1-2T Za’atar spice blend

Za’atar *

1T Toasted sesame seeds (toast in dry pan over medium heat, tossing occasionally, approx 5 minutes or until fragrant)
1T Sumac
1/2 T Dried thyme
1/4 T Ground cumin

* I just made a small amount, enough for this recipe and to rub on a few flatbreads but I recommend doubling the recipe as it’s nice to have prepared for other dishes.

Cook your wheat berries according to the package instructions. I used semi-pearled so they only took 30 minutes but they can take up to an hour. Drizzle with a little olive oil and a sprinkle of salt and pepper and leave to cool while you prepare the rest of the ingredients.

Toss the aubergine chunks with 1T oil, sumac and cumin seeds, spread in an even layer on a baking tray and roast at 200C/400F for 20-30 minutes until brown and very soft.

In a bowl combine wheat berries, chickpeas, warm roasted aubergine and halved cherry tomatoes. Mix in remaining olive oil, lemon juice and plenty of salt and pepper. Sprinkle liberally with chopped parsley and za’atar seasoning to taste. Toss again and serve.

Serves 3-4

Wheat Berry Salad with Chickpeas + Za’atar, Tahini Beetroot

The tahini beetroot I made to go with the salad is a repeat recipe in my kitchen. Everyone who tries it loves the stuff and it’s a great accompaniment to all sorts of dishes, not just those with Middle Eastern flavours.

I cut the beetroot in a different way each time I make it but I think I’ve finally decided that julienned (as in the below picture) is the way to go-  greater surface area allowing for maximum sauce coverage.

I originally found the recipe at The Kitchn but now know it off the top of my head.

Tahini Beetroot:

3-4 Small to medium beetroot, roasted and peeled (Scrub beetroot, slice off greens, wrap loosely in foil, place on a baking sheet and roast at 350C for approx 1 hour, or until the beetroot fall off a knife easily when pierced. Leave to cool and skin should rub off easily)
2 Garlic cloves, minced
1/4 t Sea salt
2T Tahini
1 1/2T Lemon juice
2-4 T Water

Slice cooled beetroot into thick matchsticks (or your preferred shape)

Use pestle and mortar to grind garlic and salt into a smooth paste. Add tahini and lemon and stir until homogeneous. It will separate initially but keep stirring and it will smooth out. Thin with water to desired thickness.

Combine sauce with beetroot in a bowl, cover and refrigerate until ready to serve. It’s best left an hour or 2 to sit so the sauce soaks in.

Serve with the above salad or with a selection of mezze.